The first set is to choose a process to copy from the process templates available and create a project where leads generated will be placed. The good news is this is menu driven and can be done in one step.
- The first step is to open the Marketing Resource Center, choose Automation from the tool bar on the top of the screen. The tool bar referenced is immediately below the logo and the Marketing Resource Center title. It says Tools, Database Campaign Management, Scoring, Automation, Target Lists etc. Choose Automation.
- In the blue bar on the left side of the screen click on the plus next to the group name: Playbook Process Templates by doing this you will see the processes in the group. These processes are templates an in place as a starting for your automation processes.
- To view the processes click on the process name. The description of the process is shown the right side of the screen after you click on the process name. Under the process name is a description of the process this will help if you have questions on which process to choose. If you click the Edit Process Tab you can view the process and the details of what is included.
- Right Click on the process name in the blue bar on the left side of the screen that you want to copy. When you do this you will see a pop up box that says Copy Process Delete, Process or Add Template. Left click on the Copy Process option.
- A pop up box entitled Copy Process will appear. A screen shot of that pop up window is shown on the right.
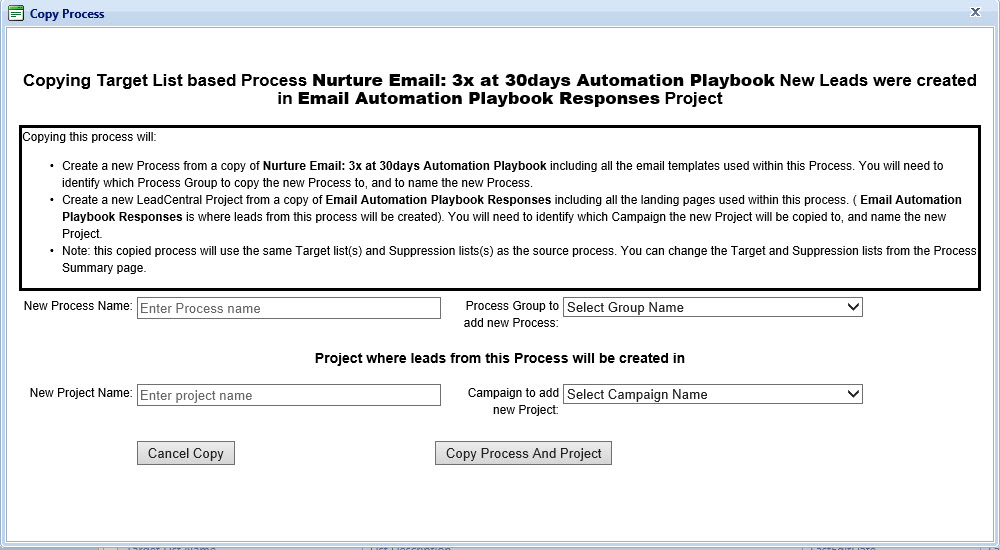 First choose a Process Name for your new Process Name and place it in the New Process Name box (The process name will appear in the blue bar when you are in Automation)
- Select a Process Group from the drop down where you would like to place your copied process (Group your processes so they are easy to find)
- Enter a Name for the New Project where the leads will be tracked. The project name should be clear and concise but detailed enough so if you went back and looked for it a year from now you could find the project easily. (This is where the leads will appear, the project name is found when you are logged into Campaign Management)
- Select a Campaign from the Campaign Name drop down to list where you want your new project placed.
- When you are done with the above steps click the Copy Process and Project button. Click Cancel Copy if you changed your mind or no longer want to copy the process and create the project.
- If a missed one of the four fields necessary to copy the process and create the new project you will get a red message at the top of your Copy Process pop up window. The message will tell you missed a required field and which one. If this happens enter the missing information and click the Copy Process and Project button again.
- Do not click the Copy Process and Project button twice. Look at the tab button to see if there is a scrolling icon this will tell you the process is still being copied and the project being created.
Next Step After the Process is Copied
- When the process is copied it will appear on your screen open on the right side of your screen.
- Under the Process Summary Tab make sure the process is not active. There is a radio button in the middle of the screen, Process Active yes or no, confirm it is set to no.
- Next edit the description and comment section on the process summary tab top of the screen. It is important to keep the description clear and up to date. This will help you in the long run keep track of what the purpose of the process is.
- Finally click the Save Changes button at the bottom of the screen. You may have to scroll down to see it. When the process is saved you will get a pop up that says “Process Updated successfully!” Click OK.
- Click on the Campaign Management at the top of the screen in the blue bar. (The tool bar is described in step 1)
- On the top left side of the screen change the drop down to “All Projects” and click the Filter Project button.
- Find and open your project in Campaign management. To do this you will need to click on the plus by the campaign name.
- Click on the project name to open the project, it will appear on the right side of the screen.
3. Review the project set up details
- Is the Project name and Lead Source name correct? Modify each of these fields as necessary.
- Update the Division
- Update the Source Type
- Are you assigning to the correct contact? (Lead Distribution)
- Is the default grade correct? Rules can override the grade in the project, that means the grade may be Nurture in the project as if someone fills out a landing page the lead will be regarded when that lead is submitted.
- The sales email is sent by the process so it is not needed in the project.
- You do need a Source Description. Find the text “Source Description” on the left blue bar under your project to enter this description.
- If you made modifications click Update at the bottom of the screen.
You are ready to go to the next step and enter the content for your landing pages used in the process.