Testing a Target List Based Process

The final step is to test your new process. Testing a target list based process is different than testing a project based process. A target list based process is run against a target list, a group of names not necessarily in one project. The process starts when it is turned on and the process runs through every contact in the target list. As new leads are added that match the list criteria, those leads run through the process the next time it runs.

The first step to testing your process is test the Test your Email Template Content. We are assuming that you have completed this step when you entered your content. If not we recommend you go back and review the content so when you are testing the process you can concentrate on the process not the email content. If you haven’t done so already go back and modify the subject line of each email with ::Name:: at the front. This helps in testing.

Steps to test the Process

TestTargetListProcess

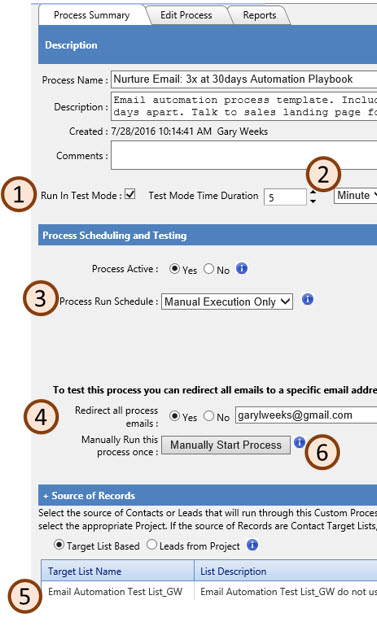
  1. Put the process in test mode (1)
  2. Set the test time at 5 minutes minimum (a longer wait is fine if desired) (2)
  3. Set Process Active radio button to Yes
  4. Choose a Run Schedule of Manual Execution Only (3)
  5. By Redirect all process emails. click yes and enter a redirect email address (If you do not enter a redirect email address leads will be sent to sales) (4)
  6. Verify the process is using a Test List as your target list. (5) There are test lists set up for you in the List Templates folder. “Testing1 Automated Nurture Playbook Template”, if you need to add the list to your project, click Add Target list button and look under the group “List Templates”. To select the list you want enter a check in front of the list name and click Save.
    • There are two test lists in the List Template Folder. Contacts can only be run through a process once so if you need to test the process more than once the test list will need to be changed to “Testing2 Automated Nurture Playbook Template”
    • If you want a larger group of names in your test list, for example if you are testing a process with 6 emails you can add both Test lists to your process, “Testing1….” and “Testing2….”
  7. Suppression list is needed for the process to run – there is one on your defaulted on your project “Master Suppression Playbook Automation Processes” If it is accidently removed click Add Suppression List button and look for this list name under “Suppression Lists”
  8. Click Manually Start Process Button to begin testing.


The Testing Process

Once the process is started you can utilize the testing template created to help walk you through the steps of testing a process. The leads that are created will appear in your project, assuming you set up the landing page links utilizing the “Copied” function.

Leads that are generated in your testing will be added to your project. As long there is an email address in the Redirect all process email section (4) then sales will not be notified of the leads.


Enter Email Content

The email templates from the process you copied are in the newly created process. Edits can be made to the made to the emails in the new automation process and will not affect the original process.

In Automation click the plus next to the Process Group (1) where your new process resides. Click the plus by your new Process (2). You will see the icons indicating the attached landing pages, and the email templates. The white envelopes are the prospect template (3) the red envelope is the sales email (4).ProcessEmails

First add the content to your Prospect emails

  1. Click on the first white envelope in the list, on the Email Summary tab edit the Document Name. It should be a name that makes it clear on the purpose of the email.
  2. On the email summary screen the subject line should also be listed. This is the subject line seen by the customer
  3. When you are testing the process we have found that it is helpful to start the subject line with ::Name:: followed by the actual subject line. That is you will know which email you are testing and the steps you want to follow based on the testing template. This template will be discussed later.
  4. If desired you can also edit the from address, from name, reply to email and reply to name. The values in these fields are copied from the email template but can be edited.
  5. After your edits are done on the Email Summary tab click Update.
  6. Click the Edit Email tab to modify the content. The templates are email wireframes so you just need to enter the text, insert webinars and hyperlinks. The templates are designed so there is a draft of the content which should help to give recommendations on the content that can be entered. You can completely change the content, the draft is just a recommendation.
  7. If you are linking to a landing page in your email template with list based processes make sure to add the “copied” function.
    • The purpose of the Copied is function is so that you will create a new lead, since you will need a new lead created and added to your project. If you update an existing leads you won’t be able to track the lead results in your project.
    • When you are linking to the landing page make sure you know the correct Landing page id. If you are utilizing the link function to find the landing page you will be fine as the tool will point to the page in your Campaign/Project. You can also verify the URL with the one you wrote down when you were editing the landing page.
  8. When you are done make sure to click the Update at the bottom of the screen
  9. Test the email from the Email Summary tab. If you need additional instructions on how to test the email message view this page. The main goal here is to make sure the content is correct, links are correct and open to the right pages.

Enter Project content into your Sales Email

The sales email is a standard sales email. It is set up so it should work with all your projects, you won’t need to add general detail. If you want to add special instructions or change the basic content of this email you can to the sales email in Automation. You cannot edit the sales email in Campaign Management. You will need to add a source description, we recommend we do this in the project found in Campaign Management.

Updating the Source description

The simplest method is to enter your source description to the project in campaign management as that content will copy over to Automation. To do this click on Campaign Management at the top of your screen, find your project expand it by clicking on the plus next to the project name, click on the “Source Description” text in the blue bar on the left side of the screen. Type your content into the Source Description box. The Source Description can be added to replace the :$:Source Description:$: code on the sales email in automation. However you don’t need to what is in the project will copy over to Automation.

There is a draft source description in your project in campaign management. Using this should help you determine what things you may want to include in your description. You can find more details on what to put in a source description and where to add it here.

Copying a Process Template

The first set is to choose a process to copy from the process templates available and create a project where leads generated will be placed. The good news is this is menu driven and can be done in one step.

  1. The first step is to open the Marketing Resource Center, choose Automation from the tool bar on the top of the screen. The tool bar referenced is immediately below the logo and the Marketing Resource Center title. It says Tools, Database Campaign Management, Scoring, Automation, Target Lists etc. Choose Automation.
  2. In the blue bar on the left side of the screen click on the plus next to the group name: Playbook Process Templates by doing this you will see the processes in the group. These processes are templates an in place as a starting for your automation processes.
  3. To view the processes click on the process name. The description of the process is shown the right side of the screen after you click on the process name. Under the process name is a description of the process this will help if you have questions on which process to choose. If you click the Edit Process Tab you can view the process and the details of what is included.
  4. Right Click on the process name in the blue bar on the left side of the screen that you want to copy. When you do this you will see a pop up box that says Copy Process Delete, Process or Add Template. Left click on the Copy Process option.
  5. A pop up box entitled Copy Process will appear. A screen shot of that pop up window is shown on the right.
    • TargetListCopyProcessFirst choose a Process Name for your new Process Name and place it in the New Process Name box (The process name will appear in the blue bar when you are in Automation)
    • Select a Process Group from the drop down where you would like to place your copied process (Group your processes so they are easy to find)
    • Enter a Name for the New Project where the leads will be tracked. The project name should be clear and concise but detailed enough so if you went back and looked for it a year from now you could find the project easily. (This is where the leads will appear, the project name is found when you are logged into Campaign Management)
    • Select a Campaign from the Campaign Name drop down to list where you want your new project placed.
  6. When you are done with the above steps click the Copy Process and Project button. Click Cancel Copy if you changed your mind or no longer want to copy the process and create the project.
    • If a missed one of the four fields necessary to copy the process and create the new project you will get a red message at the top of your Copy Process pop up window. The message will tell you missed a required field and which one. If this happens enter the missing information and click the Copy Process and Project button again.
    • Do not click the Copy Process and Project button twice. Look at the tab button to see if there is a scrolling icon this will tell you the process is still being copied and the project being created.

Next Step After the Process is Copied

  1. When the process is copied it will appear on your screen open on the right side of your screen.
    • Under the Process Summary Tab make sure the process is not active. There is a radio button in the middle of the screen, Process Active yes or no, confirm it is set to no.
    • Next edit the description and comment section on the process summary tab top of the screen. It is important to keep the description clear and up to date. This will help you in the long run keep track of what the purpose of the process is.
    • Finally click the Save Changes button at the bottom of the screen. You may have to scroll down to see it. When the process is saved you will get a pop up that says “Process Updated successfully!” Click OK.
  2. Click on the Campaign Management at the top of the screen in the blue bar. (The tool bar is described in step 1)
    • On the top left side of the screen change the drop down to “All Projects” and click the Filter Project button.
    • Find and open your project in Campaign management. To do this you will need to click on the plus by the campaign name.
    • Click on the project name to open the project, it will appear on the right side of the screen.

3. Review the project set up details

  • Is the Project name and Lead Source name correct? Modify each of these fields as necessary.
  • Update the Division
  • Update the Source Type
  • Are you assigning to the correct contact? (Lead Distribution)
  • Is the default grade correct? Rules can override the grade in the project, that means the grade may be Nurture in the project as if someone fills out a landing page the lead will be regarded when that lead is submitted.
  • The sales email is sent by the process so it is not needed in the project.
  • You do need a Source Description. Find the text “Source Description” on the left blue bar under your project to enter this description.
  • If you made modifications click Update at the bottom of the screen.

You are ready to go to the next step and enter the content for your landing pages used in the process.

Post Webinar Goals & Logic

Webinars can generate a lot of leads the critical step is efficiently and quickly following up on the leads following the event as well as collect new leads from people registering to see the webinar on-demand.

A post webinar process would be used after an event to send out unique emails to each contact depending on if they were able to attend the webinar or if they registered but were not able to attend. The customers that attended are provided an additional offer. The customers that did not attend receive a link to the on demand webinar. Everyone is given the option to download the slides, a whitepaper, and get help from a local expert. The contacts that request assistance are immediately put in the hands of a sales person. If a contact registers to watch the on-demand webinar and they had never heard or registered for the live event they can be added to the process.

Edit Custom Process Logic

The Process Templates are designed so you should not have to make any changes to the actual process. You will only need to edit the Prospect and Sales emails as well as the Landing pages. We would like to overview how the processes work and what each block does just to help you understand what the process is doing.

The automation processes use the Microsoft product Silverlight if you don’t already have this installed you will be prompted with a message and an option to download it. We have noticed that processes are easier to edit Internet explorer, but it can be done as well in Chrome or Firefox.AutomationBocks

First step lets explain the different types of blocks and what they can do

  • Start Block (1) – This round block indicates where the process starts
  • Action Block (2) – This rectangular block is used when you want to add an action, to make something to happen at this step. Actions are things such as the sending of a prospect or sales email, adding a value to the lead (for example a lead grade). You can also add a wait time if you don’t want the action to take place immediately, i.e. add a delay in the process. A good place to add an action block with a wait time is right after the start of the process so you can see the count of the leads affected at the beginning of the process, before any action is actually taken.
    • If an action block is showing with a bold line around it, this is indicating the block is a merge block. Merge blocks connect sections of the process and help the process run smoother. If merge blocks are necessary they will be in your process template.
  • Decision Block (3) – Used when you want to create a yes/no branch. For example the block make look to see if a previous email has been opened, if a lead is graded cold, or if an email was opened. This is done so the next step will be different depending on the answer the decision block.
  • Comment Block (4) – Just like it sound it is just comments, notes on the screen to remind you what is happening at different stages, add as many as you like with lots of details, as it will save you confusion in the long run.
  • Connectors (5) – straight lines and angled lines (When you add a line to your process you will have a choice for a line or a Polyline) When you right click on a line connecting two blocks choose modify in the drop down shown you can select to change the line from a straight line, the default, to a polyline (a line with bends in it.)
  • End Block (6)  – the end block tells you how many people have finished the process.

Modifying your Copied Process

To view the contents of a block double click or right click and choose modify to open and view the contents of any block. If you don’t want to make changes click close otherwise make your necessary changes and click OK to save any changes required. You will notice we recommend making the description on the blocks as detailed as possible. For example, if there is a delay in the process it is helpful to put it in the subject line. This helps so you don’t have to repeatedly open blocks to determine their purpose.

To move one block at a time

  1. Left click on any block
  2. Hold down your cursor and move the block to its new location

To move several blocks at once

  1. Left click, hold and drag your cursor over a group of blocks
  2. A yellow box will appear and size to cover a group of blocks and their connectors as you drag your cursor
  3. Lift your cursor and the selected blocks will be yellow
  4. Left click on one of the yellow blocks, hold down your cursor to move the group of blocks on the page. For example you can drag the group of blocks down the page to spread out your process or add additional blocks to the page.
  5. When you are done click somewhere else on the page to remove the yellow from the blocks allowing each block to be moved one at a time.

To copy a group of blocks

  1. Left click, hold and drag your cursor over a group of blocks
  2. A yellow box will appear and cover a group of blocks and their connectors as you drag your cursor
  3. Lift your cursor and the selected blocks will be yellow
  4. Right click on one of the blocks and choose copy
  5. Right click choose paste
  6. Your pasted clicks will still be yellow so you can click on one of the blocks and move the set on the page
  7. When you are done click somewhere else on the page to remove the yellow from the blocks.

To remove/add or modify a connector line

  1. To remove an existing line, right click and choose delete. You will get a pop up confirming you want to delete the object, which you have to click OK to continue.
  2. To add a new connector, left click and drag your cursor between the dots in two blocks. When you release the line will appear.
  3. To change an existing straight connector line to a bent line, right click and choose Modify. The pop up appears that allows you to change the type of line from Line to Polyline. Click OK when you are done. A dot will appear in the middle of your line which allows you to add “bends” in the line. Drag the dot in the middle of the line to change the angle.

To save your changes click the SAVE button at the top of the page.

If you don’t want to save your changes click the Process summary tab and the changes you made will not be saved.


Copy Custom Automation Process and Create a Project

The first set is to choose a process to copy from the templates available and create a project where leads generated from the process will be placed. The good news is this is menu driven and can be done in one step.

  1. The first step is to open the Marketing Resource Center, choose Automation from the tool bar on the top of the screen. The tool bar referenced is immediately below the logo and the Marketing Resource Center title. It says Tools, Database Campaign Management, Scoring, Automation, Target Lists etc. Choose Automation.
  2. In the blue bar on the left side of the screen click on the plus next to the group name: Playbook Process Templates by doing this you will see the processes in the group. These processes are templates an in place as a starting for your automation processes.
  3. To view the processes click on the process name. The description of the process is shown the right side of the screen after you click on the process name. Under the process name is a description of the process this will help if you have questions on which process to choose. If you click the Edit Process Tab you can view the process and the details of what is included.
  4. Right Click on the process name in the blue bar on the left side of the screen that you want to copy. When you do this you will see a pop up box that says Copy Process Delete, Process or Add Template. Left click on the Copy Process option.
  5. A pop up box entitled Copy Process will appear. A screen shot of that pop up window is shown on the right.
    • First choose a Process Name for your new Process Name and place it in the New Process Name box (1)
    • Select a Process Group from the drop down where you would like to place your copied process (2)
    • Enter a Name for the New Project where the leads will be tracked. The project name should be clear and concise but detailed enough so if you went back and looked for it a year from now you could find the project easily. (3)
    • Select a Campaign from the Campaign Name drop down to list where you want your new project placed. (4)
  6. When you are done with the above steps click the Copy Process and Project button. (5) Click cancel copy if you changed your mind or no longer want to copy the process and create the project.
    • If a missed one of the four fields necessary to copy the process and create the new project you will get a red message at the top of your Copy Process pop up window. The message will tell you missed a required field and which one. If this happens enter the missing information and click the Copy Process and Project button again.
    • Do not click the Copy Process and Project button twice. Look at the tab button to see if there is a scrolling icon this will tell you the process is still being copied and the project being created.
  7. When the process is copied it will appear on your screen open on the right side of your screen.
    • On the process summary screen make sure the process is not active. There is a radio button in the middle of the screen, Process active yes or no, confirm it is set to no.
    • Next edit the description and comment on the process summary tab top of the screen. It is important to keep the description clear and up to date. This will help you in the long run keep track of what the purpose of the process is.
    • Finally click the Save Changes button at the bottom of the screen.
  8. Next click on the Campaign Management at the top of the screen. (The tool bar is described in step 1)
    • On the top left side of the screen change the drop down to “All Projects” and click the Filter Project button.
    • Open the project in Campaign management. To do this you will need to click on the plus by the campaign name.
    • Click on the project name to open the project on the right side of the screen.
  9. Click on the word Source Description (A) to enter the project leads details for your sales people. This is the same description you used in the custom process under Automation. When you are done click Update on the Source Description window. The project does not have to be opened and resaved. Now you are ready to go to the next step and enter the content for your landing pages used in the process.

you are ready to go to the next step and enter the content for your landing pages used in the process.