Labeling Links

Links are labeled for reporting purposes. If links are labeled you are able to review what links were most often clicked you can determine what topics generate the most interest from your readers. Thus allowing content to be created that best fits your readers interest, thus driving up your open and click rates for your emails. It is a good idea for your company to determine a plan on how you want links labeled. A suggestion is Product Category followed by content type.

So although labeling of your hyperlinks in not mandatory it is definitely recommended. The report are still possible if links are labeled but it is much more difficult to read and determine what content is generating the most interest.

There are two places to label links, in the Hyperlink Manager as you add the links to your content or in the Email Summary tab both options are discussed below.

Labeling links from the Hyperlink Managerhyperlink_Manager

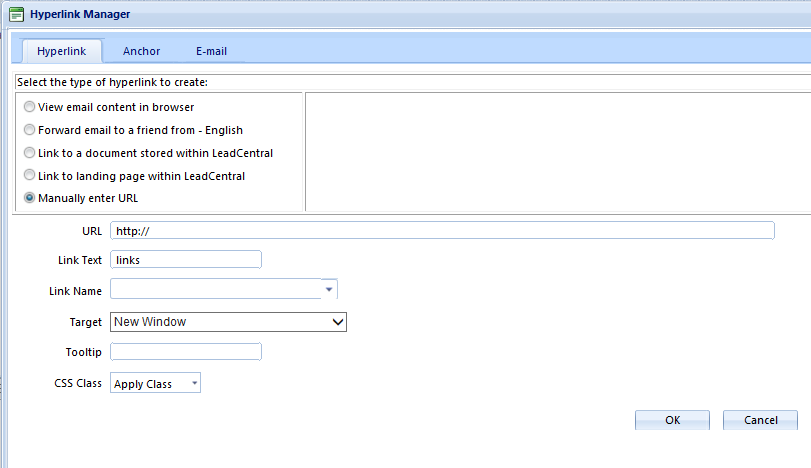
When adding a link to your content there is the option to also name the link in the Link Name field of the Hyperlink Manager. Link names can be modified in this window as well. If the link has been previously been used the previous name will appear in the window. When you are done making changes click OK at the bottom right of the Hyperlink Manager window.

When creating a target list you have the option to search for a keyword found inside the link name, thus labeling links becomes even more important. By labeling links based on the topic of interest you can later pull a list to find contacts interested in a particular topic.

We recommend that you do not use the “&” in the link name, if necessary use the word “and” instead of a “&” symbol.

Labeling Links in Email Summary tab

Labeling links in the Email Summary tab allows you to label all the links in your email all at once versus one at a time. The benefit of this is seeing all the links in your email in a list allowing it to be simpler to be consistent in your link labeling.

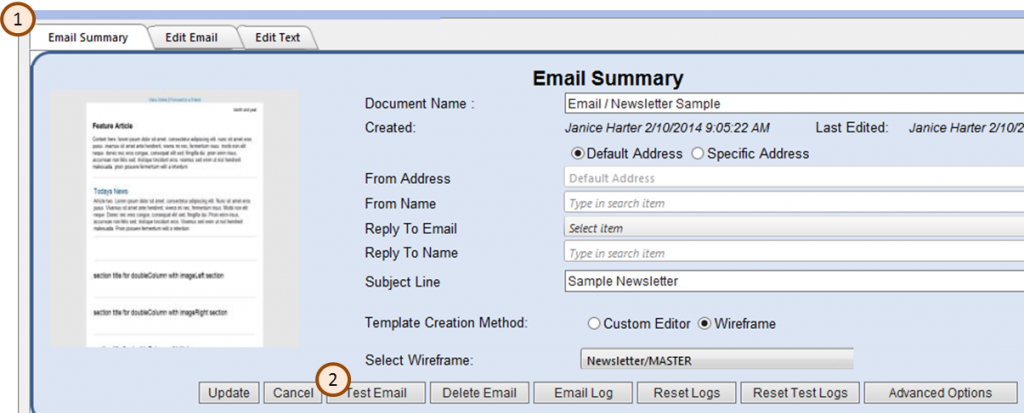
To reach the Email Summary tab click on your email (the blue envelope) on the left side of your screen, which will open the email summary window on the right side of the screen. Scroll down to the bottom of your page to see the Results by Link URL section.

Next to each link you will see a pencil, which allows you to edit the Link Name (label), then the Link Name column followed by the Link URL. The link is clickable if you are unsure where the link is pointing. Click on the pencil, a pop up will appear where you can add the Link Name. Click Update when complete. Link Names can be added or changed after the email is dropped. As mentioned above the labeling of links based on the topic of interest can be very helpful if you later want to create a target list based on contacts interested in a specific topic.

In the Results by Link URL window The links with the same Link name will be grouped together. Also note worthy is the ViewInBrowser or Forward to a Friend Links will not be listed as links.


Select Email Distribution List(s)

Find your project on the left side of the screen, click on the Project Name which will open the Project Summary tab on the right side of your screen.

Three list types must be associated with a mailing:

  • (1) Target List of people you want to receive the mailing
  • (5) Suppression List of people who specifically should not get the mailing
  • (6) Test list of people who will receive the mailing to verify that it is correct prior to the actual distribution

For each of the three types of lists, there is an (2) Add Target List button that lets you include a list. You can include multiple lists Target, Suppression and Test lists. If you make changes to your lists, click (8) Update at the bottom of the screen to save your changes.  After adding a list, you can see how may recipients are in each list by clicking (3) Calculate Count. The lists are updated dynamically, click the button if it has been some time since you have added the list and want to recheck the count. Click the (7) Calculate Count button on the lower portion of the page to get a unique number of recipients after the emails on the Target list have the contacts from the suppression list removed. To see who is in a list, click the (4) Preview button to open the List Preview window.

If you have more Target list on your project you will see an image of an error pointing down or up. You will see the arrows to the right of the preview button. To change the order that your lists are sent to you just click one of up or down arrow buttons next to the list name. This is particularly useful if you want a specific group of people to received your email/newsletter first.targetlist arrows

View_of_Lists_in_Project


Previewing a List

List_PreviewIf you open a list to preview what contacts are in the list a List Preview opens. You can modify the columns shown in the List Preview by clicking (A) the Add/Remove Columns button. Click the (B) Excel button to export the list to a worksheet. If there are certain people who you would expect to be in the list, or not be in the list, you can quickly verify their presence in the list with the (C) Search field. Enter the search information and then, in the (D) Select One dropdown, choose the column (field) to search.


Do a thorough job of reviewing the results from your list to ensure you have included all the desired recipients and no undesired recipients. If the list is not returning the desired results, adjust your criteria and repeat the preview and verification process.


Test Email Content

Before sending an email, newsletter or other document to your recipient list, it is critical to test it. When testing you want to review the content, check the links, ensure the images used are correct, and verify the deliver information and subject line. In the Tools menu you will find a checklist listing.

Email_Summary_Screen_v4

Send Individual Test Emails

Send_Test_fromEmailSummary

Test Email Popup Window

This option is most often used when you are in the process of creating your content and want to send a test to yourself. This can be done from the email template. If your email is not already open, click on the blue envelope in the project list on the left side your screen. Once the email is open click on the (1) Email Summary tab, click (2) Test Email. A pop-up window opens, leave the (A) Select mail Source radio button set Sample. In the      (B) To: field, enter the destination email address, typically your address for initial testing. Click (C) Send Email followed by Exit, after you see the message as been sent.

The email will be delivered to the address indicated, note that the subject line and address information is as it will appear in your final email. Review the email, make adjustments or corrections as necessary and continue to send individual test emails to yourself or others until you are satisfied that it is correct, properly formatted and ready for further testing.

Send Test Emails to a Test List

This method is used after you have completed your own testing and want to send the email to a list of people for approval. In the project listing on the left side of your screen navigate to the project containing the email you want to test. Click on the project name, on the right side of your screen you will see the Project open to the Project Summary Tab. On the lower half of the screen the list information is shown. In the Test List section you can see the name of the test list that is set up for your project. Click preview to overview who is on that list.

Test Email2To send a test to the test list indicated click Test by the email which you want to test from. In the Test Email pop-up, in the Subject Line Prefix, enter text that will be appended to the front of your email subject. For example, you may want to add “Test 1 –.“ When recipients get the email, the subject line will be “Test 1 – (your email’s subject)”. In the Override Email Address field, you can enter an address only if you want all the tests emails to be sent a single person. Click Send to Test Email List button. The system will prompt “Are you sure you want to send (Project Name) to the mapped Test list?” Click OK to send the test, then click the X on the top right of the Test Email popup to close the window.

Modifying the Test List

If it is necessary to modify the recipients on test list click on the Target List application on the top of the Marketing Resource Center. On the list side of your screen you will see List Categories, go down to the Test list category and find the list you want to modify. Click on the list you want to modify and the Target Summary window will open on the right side of your screen. Click the Target Definition to view the list criteria. Test lists are built based on the Criteria of the Email, thus any email listed in the Values column are included in the Test List. Add or remove a email address from the Values column to modify the list. When you are done click Save. You will get a message that says the List has been updated Successfully. Click OK. It is a good practice to click the Re Calculate Count Button to insure the list updated as you desired. For more detail on creating Target lists click here.

Creating a Text Version of your email

Some recipients will view your template as text-only. You need to prepare a version for them that you know will be readable. To do that, click on the Edit Text tab, then click the Import Plain Text From HTML Content button. This will transfer the text from the formatted version of your email as text-only. Review the text, deleting unneeded text and adding line breaks to improve readability, if necessary. Click Update to save your changes. In order to test the text email you will need to send it to a text email account.

  1. To add the Text version of your newsletter, click the Edit Text Tab.EditTab
  2. On the Edit Text Page click the “Import Plain Text from HTML Content” button at the bottom of the page.ImportPlainText
  3. I would confirm the text content looks good on your screen. You may want to add line breaks or additional formatting to make sure the email looks the way you want it to. In order to test the text email you will need to send it to a text email account.
  4. When you are done making changes click the Update button.


Approve Email Drop

Once you have approved your email, it is time to complete a check list to ensure that each item is in fact correct. This may seem redundant since you have already reviewed the content, checked the lists and made sure the images are correct but it is always a good idea to do a final proof before you send out an email to thousands of people. After it is sent is not when you want to find a mistake.

Things you will be reviewing include:

  • Content – check for misspellings, punctuation or bad grammar
  • Hyperlinks – does every link work and is it pointing to the right document
  • Images – are the appropriate images included
  • Have you labeled your links? Labeling the links will drastically help when reviewing reporting on the email drop
  • Subject Line – Is the current subject line included, is it catchy enough to draw the reader to open your email
  • Target Lists – are the appropriate people going to receive your email, is there a see list of contacts that you want to include?

These are just a few of the many things to review before dropping an email. To help you with this process we have include the Email Checklist in the tools menu of your system. We also recommend you send the email to a test list so that multiple contacts can review the email and ensure it is ready to go. For more about sending your email to test list, read the Send Test Emails Section on this page.

After approval is received you are ready to Schedule your Email drop. Directions on that step can be found here.


Schedule a Batch Email Drop

Once the email is approved and you have tested all links, confirmed the copy and images are correct you are ready to schedule. Before you schedule go through an “Email Check List” to review items that should be reviewed for accuracy. There is one posted for you under the tools menu.

Reset Test Logs

The first step is to reset the text logs this is specific to the email template you are working on. Resetting the test logs removes the open and click data that was collected during the testing process thus making the final reporting cleaner.

With your project open on the left side of the screen click on the blue envelope to open your email template. Click the Reset Test log button on your Email Summary Page. Click OK on the pop-up window that confirms you want to delete test logs. Click Update to save your changes.

ResetTestLog

Review the Lists in your Project

Before scheduling a drop it is important to review the Email Distribution section of your project, specifically the Target and Suppression lists. This information can be seen in the project. There are three sections: Target lists, Suppression Lists and Test lists. Verify which lists are selected and ensure the information is correct. Note, It is possible to have more than one list in each of those sections.

To calculate how many contacts the mailing will be sent to click the Calculate Count Button that is seen on the lower part of your project below the selected lists. When you click this button the system will calculate the total number of recipients that will be sent the mailing, removing duplicates between lists and any contacts that are being suppressed by your suppression lists.

WarningEven if you think you are the only person that has touched your project this is always an important step. Take the time to recalculate the count of your drop versus risking sending your mailing to more (or less) people that you intended.

Once you have verified the count is correct go to the next step. If the count appears incorrect verify the list criteria of the target and suppression lists, if you need help contact your GrowthPoint contact.


Scheduling the Drop

Scheduling is done at the project level. In the Email Templates section of the project in the Status Column change the drop down from editing to Approved. Next is selecting the date from your drop. In the Schedule column click on the calendar icon to select the date followed by clicking on the clock icon to select a time from your drop. The clock is based on server time, which can be found on the Email Template window. After selecting your date and time click Save New Schedulescheduleddrops

Scheduling the Second Drop

If you want the newsletter to automatically send out second drop to those that didn’t open the first newsletter a second drop. Studies have shown that dropping a newsletter a second time to those that didn’t open the first email raises your open and click rates significantly.

To Schedule a second drop in the Second Drop column of the Email Templates section of your project Click the calendar icon to select a date and the clock icon to set the time. Click the Save the New Schedule Button, then click the Save Second Drop Schedule Button.

It is important to know that the second email drop will send to the people that didn’t open the email in the first drop. For example if names are imported that would be added to the first list between the first and second drop they will not be emailed. Only names from the original list that did not open the message will be sent the message on the second drop.  Details on who is sent the second email drop can be found here.


Adding a Delay From Last Sent Email

Select a number of Days from the drop down in the Delay From Last Sent Email column. We recommend choosing 1 day if the message is time sensitive and 4 days if the message is not time sensitive. At your discretion you can choose any other option in the drop down.

Verify your Schedule

After you are done making changes to the project click Update at the bottom of the page. It is a best practice to always go back and review the date and times of your drops to ensure a mistake has not been made. If you do not click Update your changes will not be saved.

If it becomes necessary to reschedule or cancel a drop – those instructions are below:

Rescheduling a Drop

If you need to change a drop date or time before a email has dropped click Reschedule First Drop or Reschedule Second Drop and then click the calendar icon followed by the clock icon to select a new time and date and then the Save New Schedule button.scheduleddrops

Cancelling a Drop

If it becomes necessary to cancel a drop Click the trash can icon next to the Reschedule First Drop Or Reschedule Second Drop Button.