In this step you will customize the landing page for the specific offer. Before starting this step, determine what the offer will be and how its value can be “sold.” When the visitor reaches the website, they need to see the value in taking the time to complete the page and request the offer.
In the Campaign list to the left of the screen, find the project and click on the landing page you want to edit. Landing pages are designated by a blue and yellow page icon and the page name you provided when the page was created. The page will open on your screen on the right to the Landing Page Summary Screen.
To simplify the process of creating a landing page you can utilize a landing page wireframe. This is the template which has the outline and design all fixed and set-up for you with text boxes where you can add your content. A huge benefit of utilizing a landing page wireframe is the design of the page is set and by a click of the button you can open a text box to add your content, you do not need to create a design, write or edit html or choose a font size or font type that is all pre-set for you. The form fields are set and do not need to be modified in any way. Specific fields that needed based on the page type are already there for you. For example Country must be included if someone is opting into a newsletter and if you have specific information that needs to be collected so the leads are graded appropriately those fields are included in a lead generation page. There are several different templates to choose from, sales lead, nurture lead, pages with and without images. The templates are named so it is clear which ones are to be used for a nurture campaign vs. which templates you will want to select when you want a sales lead created.
So how do you create a landing page using a wireframe template?
- Add a landing page to your project by choosing the option “Add New Landingpage” option. If you need more details on creating a project or adding a landing page to a project click here.
- You can choose to copy an existing page if so desired. If the original page is a custom page the html page will be copied over. If the page you are choosing to copy is in a wireframe then the wireframe and its current content will be copied.
- Click on the Landing Page Summary and choose Wireframe in the Landing Page Creation Method section. When you do this you will see the wireframe available. Your choices are in folders and named clearly so you can tell the purpose of each option. If you are not sure which option will best meet your needs, contact your project manager. Do you need help choosing a Landing page Wireframe? The naming structure explaining how to easily determine the purpose of each wireframe is outlined here.
- If you determine you want a different Landing Page wireframe it can be changed. If you change wireframes you will loose any content you have entered. We recommend that you delete the landing page from the project level and start over as this will make sure you have no browser caching issues that will cause your page to not look right. After you delete the page start back at step 1 adding a new blank page.
- In the Edit Landing Page tab as well as on the Landing Page Summary you can see the name of the wireframe you have chosen. (1)
- There is an image of sample landing page wireframe shown on the right, in this sample there are images included. (3) Not all wireframes include the option for images.
- Next step is to add your content. To start click on the Edit Landing Page Tab. Adding content to a Landing Page is the same as adding text to a Email Wireframe. There are details below, however you can also find more information on adding text here. A screen shot of a sample landing page is shown to the right.
- On the Edit landing page tab click each text box to open the Dynamic Section pop up and add your text. (2) There are separate text boxes for each type of content, the headline, subhead and body text. When adding text the font size and type is preset for you all that is necessary is for you to add the content, however you are able to bold, underline, indent add bullets and hyperlinks if you so choose. After entering your content into text box click save (the button is at the bottom of the Edit Dynamic section popup box) and after all the content for you landing page is entered click update at the bottom of the landing page.
- If you want to copy the text for the page from a word document you can, it is recommended that you paste the plain text into the wireframe. You can also copy the text from a different landing page. In this case it is recommended that you open the page in a browser that you want to grab the content from. They copy the desired text and paste as plain text in the new landing page wireframe text box.
- To paste as plain text, copy the desired text then right click in the Dynamic section popup (that opens when you want to add text) and choose paste as plain text from the drop down.
- Does your page have editable images? If so you will see gray boxes on your landing page wireframe. (3)When you hover over the image the cursor will change to a pointer hand. Click the image placeholder to view the document manager will appear, you can upload new images or select one from the library. If you need more detail on how to use the Image Manager click here.
- The form fields are set (4) and will map to the appropriate fields in the live system. These fields are not editable. If there are fields you need on your wireframe that are not there talk to your project manager who will be able to determine if there is a better template to use or if a new wireframe is necessary.
- After entering text for your Landing page the next step is to enter content on your thank you page. To do this click on the Edit Thank You Page Tab. Just as you did on the landing page click each text box section and add and save your content.
- Do not forget to add a link to your offer (if there is a downloadable offer) in the “Download Now” button.
- When you click on the button you can change the text in the pop up window. To do this simply type over the existing text and click save.
- Next click on the Hyperlink icon in the Edit Dynamic Section window. The Hyperlink Manager window will open, allowing you to create the link to your document. How you create the link depends on where the offer is stored.
- Document stored in LeadCentral: Click this option to see a menu of folders where the offer could be stored. Navigate to the correct folder and select your offer document. In the Link Name field, label the link with the name of your offer. Leave the other fields at their default and click OK.
- If the document isn’t stored in LeadCentral and you do not plan to take advantage of LeadCentral’s ability to track and report downloads, select In the Hyperlink manager window select, Manually enter URL. Enter the URL and the Link Name, then click OK.
- To link to a document stored within LeadCentral that has not yet been uploaded, first the document must be uploaded into the Document manager, click the (2) Document Manager icon. When the window opens select the folder to add your document to, or create a new folder and then select that folder. Click Upload at the top of the screen, click select and find your file for uploading. It is a best practice to not have spaces in the document name. After your document is selected click Upload at the bottom of the screen. You can upload multiple documents at one time.
- After the item is uploaded highlight the text that you want to link to and click on the (1) Hyperlink Manager icon, select the radio button for Link to a document stored within LeadCentral. Select the document you have just uploaded, you should enter a Link Name. This is not mandatory, just a best practice. Click OK when you are finished.
- When you are done with your Thank you page edits make sure you click the Update button at the bottom of your page to save your changes
- You are not done yet. The last step is to test your new page. It is very important to review and test the landing page. Proofread the text to be sure it accurate and grammatically correct. If you are using a Landing Page Wireframe you will save yourself some time in testing since the look and feel of the page (in a variety of browsers) as well as the field names are already tested and mapped correctly. There are several ways to test the page and you can read about the process in detail here.
Alternatively you can create your own page
An existing page can be copied or you can start with a blank page and enter all your own HTML. If you copy an existing page we recommend that you choose a template from the Master Custom Landing Page Templates Campaign.
- If you are changing content/or adding content to a copied Customer Landing Page Template begin by clicking on the Edit Landing Page tab to view your landing page. Highlight the text you want to edit. We recommend changing a paragraph/line at a time. For example, first highlight the Headline and make the necessary change, then highlight the next section and make those changes.
- The format of the text is built into the page, so new text you enter will format automatically. The form fields on Custom Landing Page templates are set and will not need to be modified.
- When you are done making your text changes, click Update at the bottom of the page. If you forget to save you changes, you will get a reminder message. If you do not want to save your changes, click Cancel.
- Edit the Thank You Page. To do this, click on the Edit Thank You Page tab at the top of the screen. Make changes to the text using the same process used for changing the landing page text.

- It is critical to remember to add the hyperlink to your offer on the thank page. There are instructions above in step 7 above in the instructions on using a landing page wireframe if you are looking for more detail on creating a hyperlink.
- Click update to save the changes you made to the Thank You page.
- Don’t forget to test your new page. When creating a page from scratch it is important to view the page in several different browsers or use a tool such as BrowserStack to see what a page looks like in a wide variety of situations. Pages can look dramatically different in different browsers which is why we encourage the use of wireframes as all these factors are already tested. To test your landing page you can follow these tips.
Advanced features are available on all types of landing pages
On the Landing Page Summary tab you will find a variety of advanced features that allow you to add special handling to your landing page.
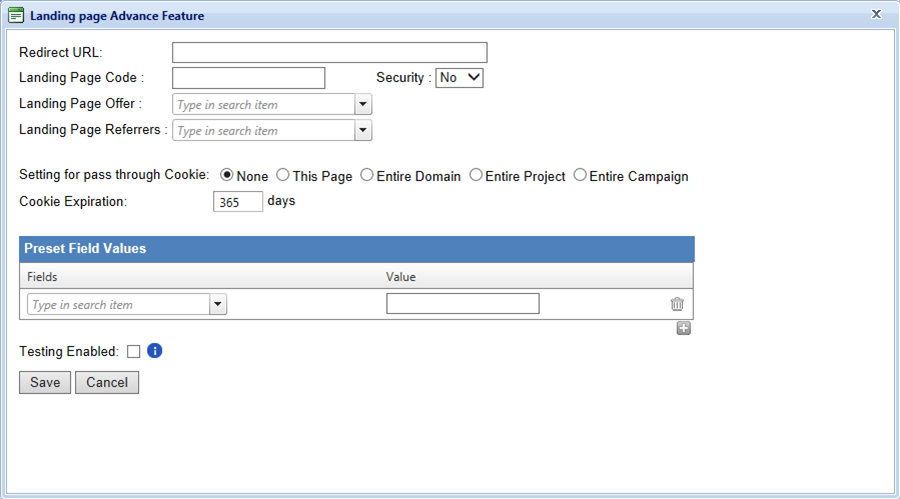
Landing Page Advanced Features Window
To reach these click on the Advance Feature button on the landing page summary tab. The options available include:
- Redirect URL: Redirects the user to a new URL after he/she clicks Submit on the landing page.
- Landing Page Code: Allows enabling of special rules based on the needs of your project. Talk to GrowthPoint for more information.
- Landing Page Offer: The Current Offer can be tracked in this page, if data is entered here it is viewable in the Lead Resource Center. We have the ability to track all offers, and pull a monthly report to show the results of these offers, if that is something you are interested in then an offer would not have to be entered in this field. To have this report created contact GrowthPoint.
- Security: Leave setting as No.
- Landing Page Referrers: Leave blank. Used for reporting.
- Setting for Pass through Cookie: This is an option you might want to modify. When enable, it allows visitors to avoid re-entering their contact data in order to retrieve an additional offer. You can provide this feature for return visitors to only this page, the project, the campaign or your domain. You can time-limit this feature to the desired number of days. We recommend allowing a pass through cookie for only the page, with a Cookie Expiration of 30 or 60 days.
- Preset Field Values: This option allows a field and field value to be entered on every lead submitted, without the visitor having to fill out the field. An example would be to enter the title of a document offered. To use this feature, click the plus sign on the bottom of the Preset Field Values window. In the Fields dropdown, start typing a field name to see all the available fields containing those characters. Click on the desired field, then enter the value (e.g. the document name) in the Value field. Click Save then click Update.