To set up a basic project, open the Marketing Resource Center (MRC) to see a listing of your Campaigns. Right-click on the Campaign you want to add the project to, then left-click on the Add Project option. A new blank project form will open on the right side of your screen. The first thing you want to do is fill out the Project name.
Use naming standards your company has set up to make it is easy to find projects in the future. A typical naming standard is [vendor]/[media tactic]/[start date], for example EPE/Webinar/March 2014.
Listed next to the Project name is the Campaign name you selected to house the Project. This is automatically filled in for you. If you need to move your Project to a different Campaign, open the Project and change the Campaign name using the dropdown arrow in the Project Setup Details section.
Enter Project attributes
Under Project Attributes you have three options for Project Type: Standard Process, Custom Process and Send Batch Email. For this example, we chose Standard Process. We will explain how to create a Custom Process and Send a Batch Email in another section of LeadCentral Help.
- Standard Process: Used to create a project that won’t need any special rules for handling responses. The standard rules will be used to grade and assign leads, and send out specific communications after a lead is generated.
- Custom Process: Used when special lead-handling is necessary. The leads will follow the rules for grading and assigning, but the communications sent out following the lead being added are customized. The grading and assigning rules can also be modified using this process.
- Send Batch Email: Sends emails to a target list, but no leads are entered in the Project.
After entering the Project Type, additional fields appear.
Project Code is used for specialized lead handling. Leave this field blank. If specialized rules are needed, call GrowthPoint. We will help determine how to accomplish your goals.
In the Division dropdown, choose the Division the leads are intended for. This field is used for reporting.
In the “Source Type” of these Leads? dropdown, choose the marketing tactic for the lead from the dropdown list. You can also add to the list if there is a source missing, but avoid cluttering the list with too many sources.
Enter the Lead Source. This information is seen by the sales person and used to track the lead. The Lead Source can be the same as the Project name but does not have to be.
Select Lead Source
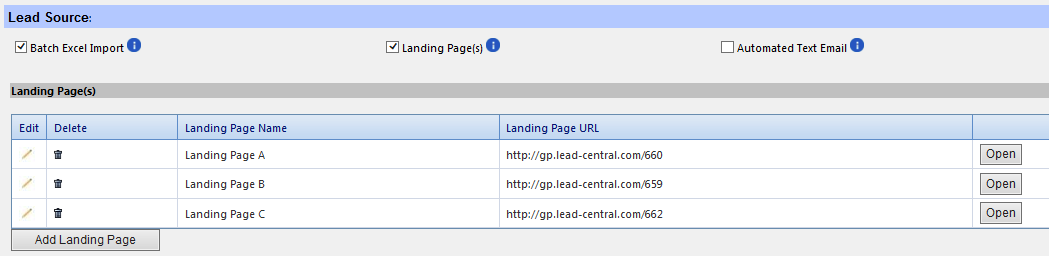
The Lead Source indicates where the lead is being generated from. Leads can be entered from an Excel spreadsheet, via LeadCentral Landing Page(s) or from a text email. Leads can be entered into a Project from more than one Lead Source.
- Batch Excel Import: Check this box when leads are being entered from an Excel file for tactics like a tradeshow.
- Landing Page(s): Check this box when leads are entered via a LeadCentral Landing page. More information about setting up a landing page can be found here.
- Automated text email: This option is used to collect leads by integrating with other systems or websites. If you want to explore this option, contact GrowthPoint.
Select how leads will be assigned
In the Lead Distribution section, select who should receive the leads from the dropdown . All leads are assigned, even if they are not sent to Sales. Choose the default unless you know it should be something else.

Select lead grading method
In the Lead Qualification, section choose a grade as a default for the Project. Filter rules can be set to override the grade selected. Grades added from your imported list or a landing page will override the default Project grade.

The Telesales Required field is checked if leads are going to be assigned to telesales. To use this option, talk to GrowthPoint.
Customer Communications
In the Customer Communications section, you have the option to choose who will receive emails when the lead is entered into the system. The email to Sales notifies the sales person they have a lead to follow up on and gives them needed details. Once the lead is added to the system, it is important to follow up via some communication to thank them for their interest, further engage the prospect with additional offers and provide them with the name of their sales person.
- Sales and Prospect: Both the prospect and sales person will receive an email message when the lead is entered. It is always good to email the prospect to engage them further. The sales person needs to be notified when they are assigned a new lead for follow-up. Only leads graded Hot or Warm will be sent to the sales person, even if this option is selected.
- Sales Only: An email is sent to the sales person when the lead is entered in the system. Emails to Sales are sent only if the lead is Hot or Warm. If this option is selected and the lead grade is not Hot or Warm, no email will be sent. This option is used when you don’t want to send the prospect an email. You might want this because they previously received an email, or the leads are old and you want Sales to follow up but don’t want to notify the prospect because of the delay.
- Prospect Only: An email is sent to the prospect but not to the sales person. This is an good option for an event registration
- None: No emails are sent out.
After you have selected who will receive an email, additional boxes will appear to select the email templates you want to use based on the recipient. For the Prospect email option select the Blank Template in the Prospect Email Template from the dropdown. This will give you a blank slate for entering content. After you select a template, follow the prompt to name it. Use a descriptive name that will help you and others identify the purpose of the email. Click Okay.
Later you will have an option to select a wireframe (design) and enter the data for your email. Instead of creating a new email template from a wireframe, you can copy a previously created email by selecting it from the Campaign/Project listing found in the dropdown.
For the Sales Email template dropdown choose the default sales template.
The Redirect all Project Email option is used when testing a project. If you check the option and enter an email address, all the projects emails will be sent to this address. This will be discussed further in the Testing section.
Project Goals
This section is optional. If you enter data here, it can be valuable when creating Project reports. Anything entered in the Project Notes/Comments can be viewed only via the MRC. You can use this for any background information or details about the Project, but this information cannot be included in reports.
When you are done making changes click Update.