Steps to Turn the Process On
Once testing is completed you can turn your process on. The following steps walk you through this step.
- In Automation, Click on the process name on the left side of your screen and Edit Process (1) after the process is opened.

- Click on Reset Count (2) at the top of the screen.
- Click the Save button (3) at the top of your Edit Process Screen.
- Open each Prospect Email in your process and remove name token (the ::Name:: code) from subject line of emails. To open your prospect email click on the process name and each of the white envelopes on the left side of the screen. Each envelope represents a prospect email.
- Click on the Landing page icon on the left side, blue bar, and click “Clear Data Log“
- Click on the Process Name on the left side of your screen.
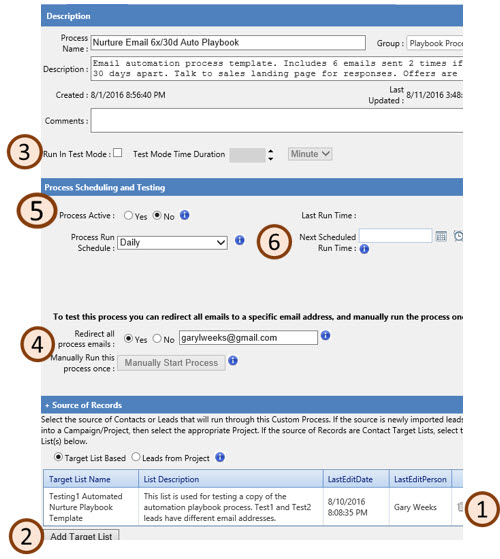
- On the Process Summary Screen, remove test list (1), by clicking the trash can next to the list name on the screen
- Click Add Target List (2) to add your created Target List for this process.

- On the Process Summary Screen, take the process off of Test Mode (3) by unchecking the test mode check box.
- Under Redirect all Process emails (4) change the radio button to No and remove the override email address
- Change the process to Active=Yes (5) by clicking on the radio button by Process Active
- On Process Run Schedule (6), select Manual Execution Only.
- Set a Next Scheduled Run date and time (6) under the Next Scheduled Run Time box
- Click Manually Start Process button (4).
- Click Save Changes at the bottom of the Process Summary screen
Once the process has started you will see numbers appear in the Start Block and the first Action Block, a wait block, in your process. The wait block is there so that when a process is started with a target list you can see how many names will be processed. The count that you see should be slightly less than the target list as a name could be suppressed via the suppression list. If the count looks extremely high you can stop the process by changing the process to Not active. You do this by Opening the Process Summary screen and selecting Process Active No and select Save changes.
If you have carefully created the target list and checked the counts then once you have started the process the count should be correct and you will not have issues.
Your Final Step
If your lead counts look correct, on the Process Summary page
- Change the Process Run Schedule from Manual Execution Only to Daily
- Set a Run Scheduled Date and Time
- When you are done Click Save at the bottom of the screen.