Yes. If you have a hunch that something on your webpages aren’t working or maybe you want to try something new, but aren’t sure how to evaluate whether its successful. Either way, the solution you’re looking for is A/B testing. A/B testing
A/B testing (or split testing) pits two (or more) versions of a page against each other to determine which is more successful, in terms of the goal you set. For example you may want to see which results in an increased conversion rate. Running A/B tests gives you real, quantifiable data on your users and can help you make more educated decisions. Setting up a Landing page test in Lead Central is relatively simple.
Setting up your A/B Test
1) Add a Landing page to your project, maybe this is your standard landing page format or you can create a test from a project that already has a landing page with results attached.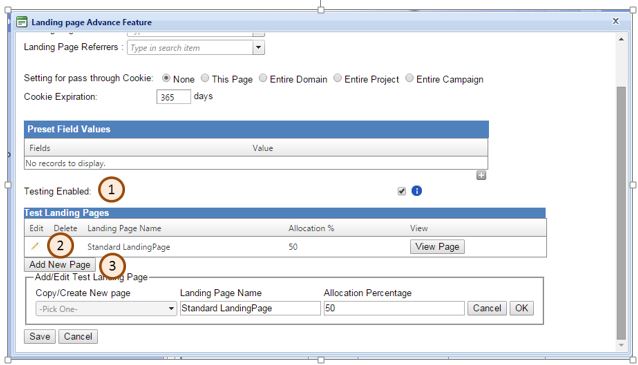
2) On the left side of your screen click on the landing page. A thumbnail and Landing Page summary will appear on the right side of your screen. Click on the Advance Feature button seen on the Landing Page Summary screen. When you click you will see the Landing Page Advance Feature pop-up screen. This screen is shown to the right. Then click on the check box by the Testing Enabled: (1). You will see a pop-up that confirms that the results from the current landing page will be moved to the first version of your landing page test. Click OK, if this is what you want to do.
Why is there a warning message?
If you have a active landing with results you can continue to use the page as part of your test. The results that are attached to the page will move to the first version of your test. That is when you start your test the results will be added to your existing results. If you plan on making extensive changes to the page then you may want to set your first test to a 0% to preserve the orginal results. There is more on how to set your test percentages below.
3) Now that you have accepted the pop up message you can see the first page attached to your project. Click on the pencil (2) next to the page name to edit the page name or allocation percentage, the page defaults to 100%. When you are done click OK.
4) Click Add New Page button (3) to add additional pages to test. Choose a page for the Copy/Create New Page drop down, name the page and set the allocation percentage. Adding a landing page is just like adding a page in a project with a single page. Scroll down to Master Template and Misc., click on the plus by the project entitled Current Branded Landing page Templates. Choose the desired landing page to copy. The landing page domain used will be the same one that you set up in your original Landing page.
5) Click Save. Then on the left side of your screen you will see a plus sign next to your landing page. When you click on it you will see the pages set up for your test.
Making changes to your pages
Click on the page you want to edit on the left side of the screen then make edits by clicking on Edit Page or Edit Thank you page so you would typically do for a page that is not have a AB Test set up.
Reporting
Take a look at the results of your test by click on the master Landing page. On the right side of your screen you will see the Landing page summary and a section entitled Results by Landing Page. In this section the Name of each page will appear and you can see all the typically tracked results such as Opens, Conversions and Conversion Rate. There are much more data available for viewing in this section.