Testing is a very important factor in your marketing portfolio. Before sending out your email you can set up an A/B test of your email template to test the subject line or even the content of the newsletter. The system allows you to split your test as many times as you want (even though we are calling it an A/B test), although keep in mind the size of your mailing list before you split into multiple tests. You could always make a test schedule to document what you want to test, the timing as well as track the results. The list of what you can or may want to test may be endless but as you gather results of each test your list of what needs testing may be modified as you discover what works best for your market.
Setting up an A/B Test
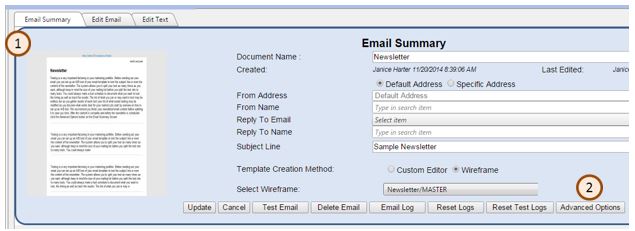
Lets start by overview on how to set up an A/B test. We recommend you finish your newsletter/email content before splitting it to save you time, this includes creating the text version of the newsletter. After the content is complete and before the newsletter is scheduled. Open the prospect email and then click on the Email Summary tab (1) then click the Advanced Options button (2), which will cause a new window to open, shown in the second screen shot.

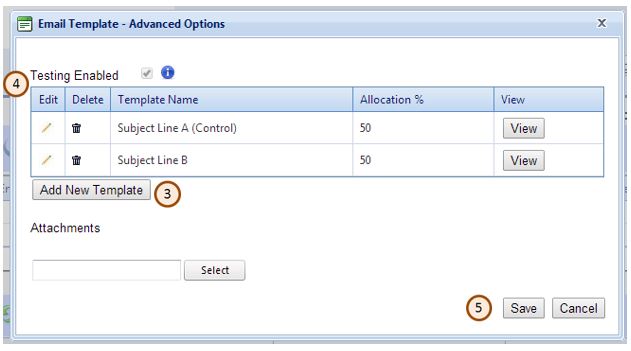
In the Email Template – Advanced Options window (shown to the right) you can set up your tests. First click the Testing Enabled check box (4) which will show you your original template. Click Add New Template Button (3) to add additional versions to test. When you click the Add new template you will get an additional popup to Add/Edit AB Test Template. First label your template a logical name as it is shown in reporting. Next choose a template to copy, from the template location drop down.
You can choose Campaign-Prospect or Process-Prospect. Campaign-Prospect is the location of a template that is the Campaign Management system. A template will be in Process-Prospect if it is part of a Automation Process (under the Automation tab in the MRC). After you choose one of these options you will see the standard tree structure. Find the template you want to copy, click on it and indicate a percentage of your list to get that version of the template and then click ok. In the example you can see we are running an AB test so each version is going to 50% of the list. To change the percentage on any of the templates click on the pencil (under edit) next to the template name. In this window you can also modify the template name, if necessary. Before you click save (5), your Allocation % needs to equal 100%. And each percentage has to be full number.
Editing your New Templates
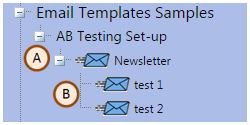
You now have 2 (or more) templates attached to your project. On the left side of your screen you will see your templates and there is an example shown on the left. When a prospect email is split into test there will be a plus sign next to the blue envelope (A). When you click that plus the drop down will expand (B) and show you the versions of your template. (in the screen shot that would be Test 1 or Test 2)
By clicking on the blue envelope for each template (Test 1 or Test 2) you can make the necessary changes. Edits are done the same if the template is an AB Test or if it is an individual template. For example to do a Subject line test click on the email summary tab (1) for the template you want to change (for example Test 1) and enter the subject line then click update to save your changes.
If you want to make content changes, first open the email template you want to change, then click on the Edit Email tab and make the necessary changes. Make sure to click Update at the bottom of the screen to save your changes. For more detail on how to make edits click here.
Viewing the Results
To see the results of your test you can click on the Master email template (A). On the right side of your screen you will see the Email Summary Tab open. In the results sections there is a new column shown, Template Name. Under the Results by Email template section you can see the results broken down by email template. For example, open rate breakdown for each test as well as all the rest of the results fields such as total clicks, unique clicks etc. In the next section you can see the Results by Link Url section there is also a breakdown by template name.
