The email templates from the process you copied are in the newly created process. Edits can be made to the made to the emails in the new automation process and will not affect the original process.
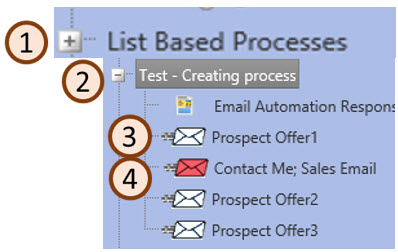
In Automation click the plus next to the Process Group (1) where your new process resides. Click the plus by your new Process (2). You will see the icons indicating the attached landing pages, and the email templates. The white envelopes are the prospect template (3) the red envelope is the sales email (4).
First add the content to your Prospect emails
- Click on the first white envelope in the list, on the Email Summary tab edit the Document Name. It should be a name that makes it clear on the purpose of the email.
- On the email summary screen the subject line should also be listed. This is the subject line seen by the customer
- If desired you can also edit the from address, from name, reply to email and reply to name. The values in these fields are copied from the email template but can be edited.
- After your edits are done on the Email Summary tab click Update.
- Click the Edit Email tab to modify the content. The templates are email wireframes so you just need to enter the text, insert webinars and hyperlinks. The templates are designed so there is a draft of the content which should help to give recommendations on the content that can be entered. You can completely change the content, the draft is just a recommendation.
- When you are done make sure to click the Update at the bottom of the screen
- Test the email from the Email Summary tab. Your main goal is to make sure the content is correct, links are correct and open to the right pages.
Now it is time to click your Sales Email
The sales email is your standard sales email. It is set up so it should work with all your projects. If you want to add special instructions or change the basic content of this email you can. A sales email in the campaign management should not be edited, but in automation if you want to edit the content of the basic email it can be edited and will not affect any other sales emails.
The Source Description can be added to replace the :$:Source Description:$: code on the sales email in automation. However if you do put a source description here you have to also enter it into the Source description on the project in Campaign Management. Thus the simpler method is to enter your source description to the project in campaign management as that content will copy over to Automation. To do this click on Campaign Management at the top of your screen, find your project expand it by clicking on the plus next to the project name, click on the “Source Description” text in the blue bar on the left side of the screen. Type your content into the Source Description box.
There is a draft source description in your project in campaign management. Using this should help you determine what things you may want to include in your description. You can find more details on what to put in a source description and where to add it here.