In this process, you will select a wireframe (template) to create an email for distribution to a target list of recipients. Each wireframe includes certain blocks of content (text) and images (photos) arranged in a layout. In a separate step, you will later fill in this wireframe with your specific content and images.
Wireframe Vs. Template
A wireframe is the preformatted skeleton for an electronic document such as an email or newsletter. The wireframe may include some static content, text and images, that will be included in all documents based on the wireframe. The wireframe includes preformatted placeholders where you will insert your custom content. The wireframe is designed to meet your brand guidelines, including appropriate formatting and use of logos.
A template is an electronic document, based on a wireframe, that has been customized with your content for a specific audience or application. Because it was based on a wireframe, all templates will have a consistent, professional appearance.
Choose Your Template
Review Available Wireframes: Before creating a new template, review the available wireframes from the Marketing Resource Center Tools menu View Wireframe Samples. You need to know the name of the wireframe design you plan to use before proceeding with the next step.
Add a New Email Template
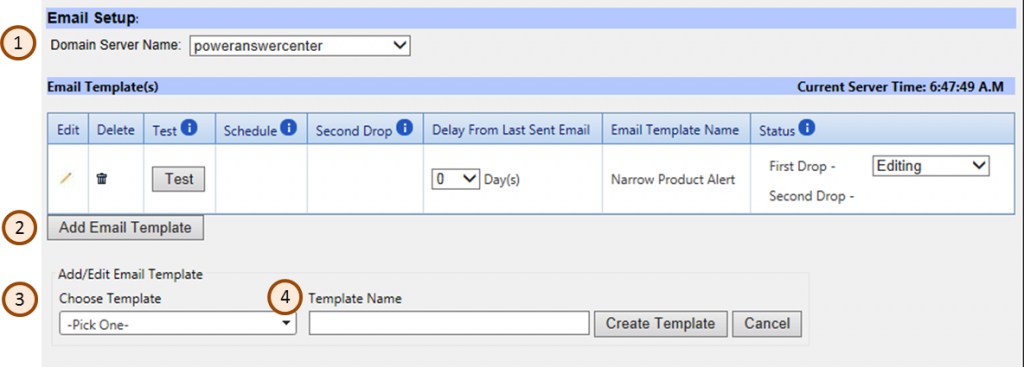
From the Campaign Management tab, in the Campaign list to the left of the screen, find and open your project. In the Email Setup / Email Template(s) section of the screen, select the correct (1) Domain Name Server. There may be only available. If there are more and you are unsure of the correct server, contact GrowthPoint. Click (2) Add Email Template. From the Add/Edit Email Template area, click (3) the dropdown menu for Pick One and choose Add New Prospect Template. Enter the name of your email template in the (4) Template Name field. Use a name that includes its purpose and the layout name of the wireframe (Example: New product announcement – Email Stationery w/Head Shot). Click Create Template. At the bottom of screen, click Update to add the new template.
In the Campaign list to the left of the screen, find and click on the template you created.
Enter the delivery information
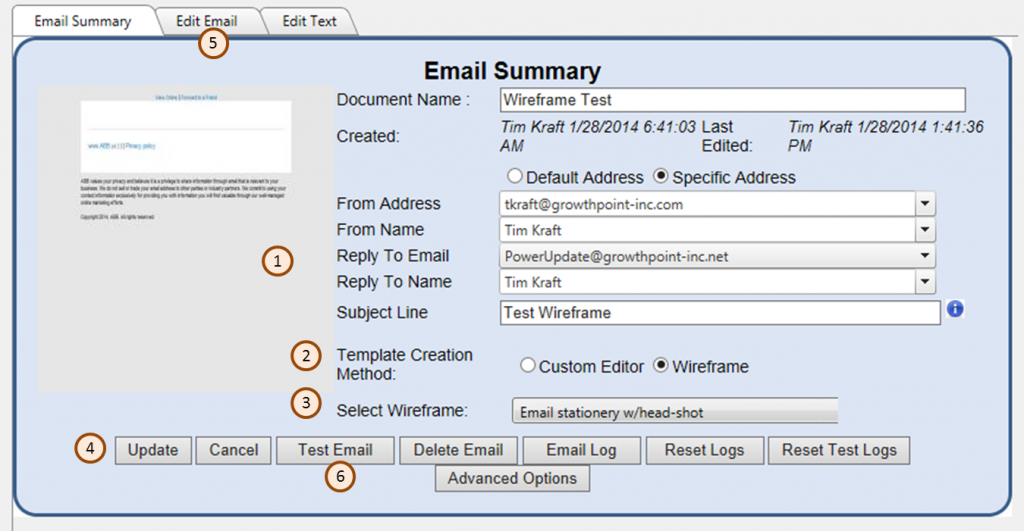
On the Email Summary tab, click the Specific Address radio button. In the (1) appropriate fields, enter the information for:
- From Address
- From Name
- Reply To Email
- Reply To Name – The only available options will be shown in this drop down
- Subject Line
All the address fields you will have a drop down of available options which you can add additional lines, except for the reply to address which an item needs to be choose from the drop down.
For the Template Creation Method, (2) click the wireframe radio button. In the Select Wireframe dropdown menu, (3) choose the wireframe design/layout you want to use. You will see a popup message saying “Changing of wireframe may lead to removal of all statistics and data of the existing template.” It warns you that, if you started a template and then changed wireframes, it erases the content already entered. (4) Click Update to save your changes.
You now have blank wireframe, ready to populate with your content.

