Create and Manage a Target List
In this step, you will define the recipients for a mailing by selecting the desired parameters. Before you start entering your list criteria, you should spend some time noting the who you want to include, and exclude, from your list. Think about the traits or criteria you will use to generate a target list that will put you in touch with the right people.
About Target Lists
In LeadCentral, you do not actually create a list of recipients for your emails and newsletters. Instead, you establish a list of parameters that define who should receive the email. The list of parameters available is extensive, allowing you to exactly define recipients. You can include list parameters to both include people as well as exclude people.
When you are ready to distribute your mailing, LeadCentral evaluates the list of all possible email addresses in the database(s) based on the parameters you entered and returns the list of only the recipients specified. Creating mailing lists using this dynamic approach ensures that recipient information is always current and that you reach the desired targets.
Create a Target List
- From the Marketing Resource Center, click the Target List tab. From the Custom List navigation pane to the left of the screen, navigate to the Group that you want to add a list to. Right click on the Target Group name you want to create a list for and, from the popup menu, select Add List. In the List Name enter a descriptive title that will help you and others identify the list in the future. You must also fill in the List Description with additional information. This could include details about the target audience and specifics about inclusions or exclusions. Click OK. You will see the Target Summary tab, on the right side of the screen, which be explained later in this process.
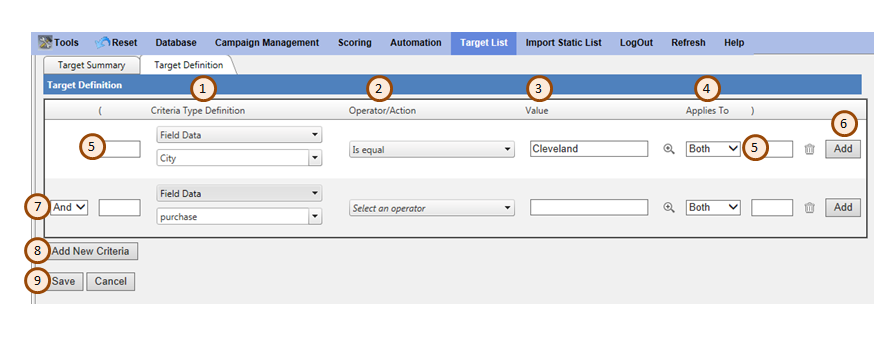
- Click the Target Definition tab to begin adding criteria for your list. Click Add New Criteria. Under the (1) Criteria Type Definition, click the Select Choice dropdown. From the list, you have the following criteria type to choose from:
- Lead/Contact Value: This is the most-frequently used Criteria Type. It includes two types of fields, standard and custom. Standard fields are the headings you will find in any database of contact information. Custom fields can be created by you based on your unique contacts, leads or sources. Custom fields are indicated by “(Custom)” next to the field name. To view the available fields, begin typing a few letters of its name and all of the available options will be displayed.
- Campaign/Project: This selects contacts inside a specific project or set of projects or an entire campaigns contacts. Check the campaigns or projects you want to include. The option to exclude specific projects is being added.
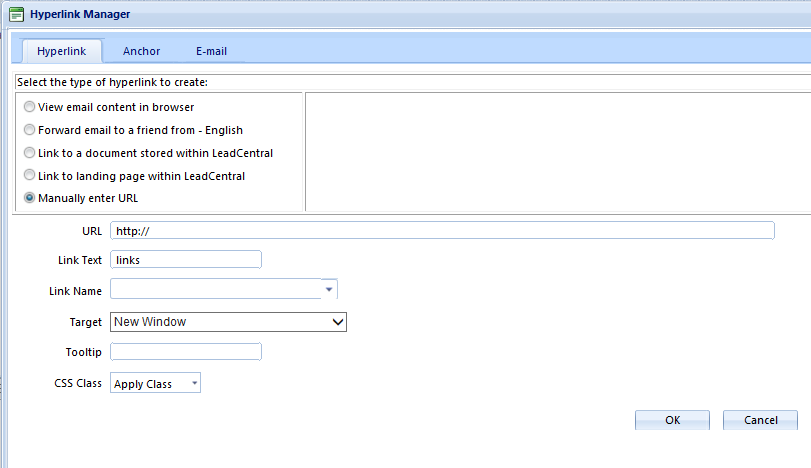
- Keyword Clicks: This option allows you to find the list of contacts that are interested in a specific topic. The feature will find any link name with that keyword. The link can be located in a landing page or a prospect email, so any link clicked. Thus you can see the importance of labeling your links carefully. When choosing this option you can opt to include all projects or limit to specific prospects.
- Email Activity: This options let you choose a email template and results based on the users interaction with the template. For example was the email opened or was a specific link clicked.
- Landing Page Activity: This selects recipients based on the fact that they visited a specific landing. After including this criteria, you will need to identify from a dropdown list the landing page you want to include. And finally what action the user took with that landing page, for example everyone that opened the page, submitted it or clicked on a specific link.
- Score Results: A contact’s score is a numerical value calculated for them based their behavior and interests over time. More detail about Contact Score is available from GrowthPoint.
- Existing Target Lists: This option allow you to imbed a target list inside of your list. The reason this is valuable is there are often a set of criteria that are used in multiple lists (for example North America Valid Contacts). By imbedding a list inside a list you don’t have to repeat that criteria each time it is utilized in a new list. And if the criteria changes you only have to change it once. For example if the imbedded list is a listing of competitor email domains to exclude you can add to the competitor list in one location and the list will be updated in every place the Existing Target List is utilized.
Define criteria
In the (1) Criteria Type Definition column, click in the dropdown button and select a Criteria Type. Depending on the Criteria Type selected, you will have a list of options in the dropdown menu(s) under the Criteria Type Definition and the Operator/Action columns.
- If you select Lead/Contact Value, you will get a new field in the (1) Criteria Type Definition column. Begin to type any part of the name of a desired data field and you will see a list of the fields that contain that text. For example, entering “cust” will show the list of all fields that include the words: customer, customer interest, top customers, qualified customers, etc. Under the (2) Operator/Action column, you will need to select the operator, such as Equal To, Greater Than, Is Part of List, etc. You will also have a field under the (3) Value column where you will enter the desired value for your selection criteria for that data field. Click on the magnifying class icon to the right of the field to see the available values in the selected field. You can choose from the list or type your criteria into the field. There is a limit of 2500 characters in this field. Under the (4) Applies To column, specify whether this criteria applies to Contacts, Leads, or both. (See below for an explanation of the difference.)
- If you select Campaign/Project, you will get a new dropdown in the (2) Operator/Action column where you can select the campaign or project. Under the (4) Applies To column, the system will default to Lead.
- If you select Keyword Clicks, select all projects by clicking on the checkbox next to ALL in the Select Project Drop down. Under (2) Operator/Action, you will get a drop down to select the operator. This options defaults to All (for the date field) and Is Like for the operator (the other option is exact match). Enter your keyword(s) under the (3) Value column for your selection criteria
- If you select Email Activity, choose whether the email was created as part of a campaign or an element of an automated process. This selection will navigate you to where the template is stored. Under the (2) Operator/Action column, you will need to select the action the recipient took. For example, you can include recipients who simply opened the email or clicked on certain links. Under the (4) Applies To column, specify whether this criteria applies to Contacts, Leads or both. (See below for an explanation of the difference.)
- If you select Landing Page, you will get a dropdown where you can select the desired landing page. A new field will appear with a directory of the Campaigns and Projects that include a landing page. Only projects with landing pages will appear in your list. Navigate to the desired landing page and select it. Under the (4) Applies To column, specify whether this criteria applies to Contacts, Leads or both. (See below for an explanation of the difference.)
- If you select Score, you will get a drop down to select the scored item or trait. Under (2) Operator/Action, you will get a drop down to select the operator. This will typically be the Numeric operator “Greater Than.” You will also have field under the (3) Value column where you will enter the desired value for your selection criteria, which is typically the minimum Score you want included as your selection criteria. Click on the magnifying glass icon on the right of the field to see the scores available. Under the (4) Applies To column, specify whether this criteria applies to Contacts, Leads or both. (See below for an explanation of the difference.) Additional information about Scores is included in another section of this help system.
- If you select Existing Target List, you will get a new dropdown in the available lists, any list can be selected however it is a best practice to keep frequently used criteria in a folder, for example System Target Lists. In the Target Summary you will see a listing of Other Target Lists(s) using this target list. Anytime a list is updated if it is used as part of another lists criteria the data will be updated in original list and all the Target lists it is a part of. You can save a lot of time by utilizing this option, version retyping a set of option multiple times in a variety of lists.
Definition of a Lead Vs Contact
Under the (4) Applies To column, in the dropdown menu, select whether the selected criteria applies to only the contact, only the lead or both.
- A contact is a unique person in the database. For example, there can be only one contact Sam Smith at Stellar Supply Company. When a new lead is generated, the system looks for the related contact. If the contact exists, the lead is attached to the contact. If there is no contact matching the lead, then the system creates a new contact and attaches the lead to it. There will almost always be more leads than contacts. Contact records hold only location (address, phone, company, etc.) and other demographic information. They do not include any information related to campaigns or projects. That information is contained in the lead(s) attached to the contact.All of a contact’s activities are logged within the system. If new leads are generated from that contact, the contact record is updated with new or changed data, like address, phone, title, etc.. The new lead is also linked to the contact record.
- Leads are generated every time a person responds to an offer. For example, Sam Smith requests a white paper by filling out a landing page, attends a tradeshow or registers for a webinar, that generates a new lead. Each lead is graded, and that grade determines if the lead will be passed on to Sales. Typically Hot and Warm leads are sent to Sales for follow-up. Nurture-graded leads are not sent to Sales; they simply document the individual’s responses. Example, just downloading a white paper is doesn’t warrant forwarding the lead to Sales. Instead, the lead is graded Nurture and can be added to target lists for further nurturing and qualification. Leads are typically viewed by Sales via the Lead Detail page.. The link to the Lead Detail page is immediately emailed to the assigned sales person when the lead is generated. Leads can also be viewed via the Lead Resource Center or Marketing Resource Center.
Add more criteria
After adding a criteria, click the (6) Add button to add the next criteria or click Save to save your criteria and move to the next step. You can continue adding criteria to further define your target list by clicking the (8) Add New Criteria button. If you need to nest a new criteria between existing criteria, click the (6) Add button to the right at the point where you want to insert the new criteria. Click the (9) Save button to save your work as you go, and when you done creating your list. To delete a criteria, click the Trash icon near the (6) Add button. When you are done entering criteria, click Save.
Order of operations
You can specify an order of operations by using the parentheses symbols on either side of the Target Definition screen. Just as in math, you can group several criteria so that they are all processed together before the system moves on to process the next criteria or group of criteria. Insert (5) parentheses to indicate how the criteria should be grouped. Also note that you can use the (7) And/Or dropdown to specify how criteria in groups will be processed. When you are done working with you criteria, click Save.
Check target list recipients
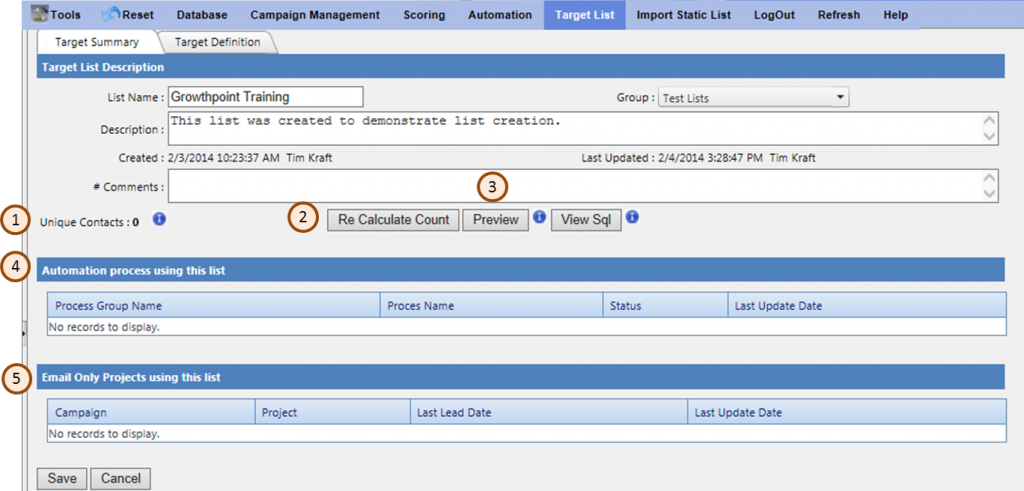
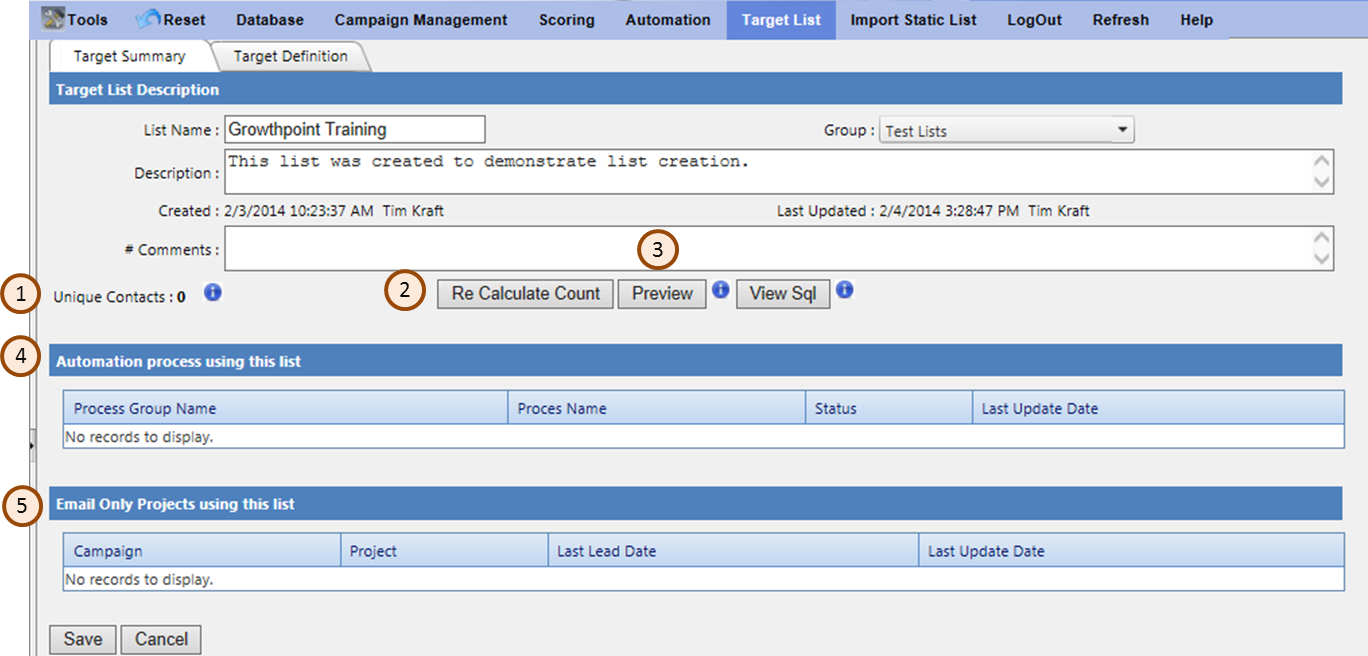
- After clicking Save, you will see the Target Summary tab. This is where you can do a quick check of the number of recipients in your list. Recall that the system dynamically creates the list each time it is run. Since this is a new list, the number of (1) Unique Contacts shows 0. Click (2) Re Calculate Count to run your list and determine the number of recipients.
- Before using a list, it is very important to preview it and ensure it includes and excludes the desired recipients. To verify the contents of your list, click (3) Preview to see the recipients.
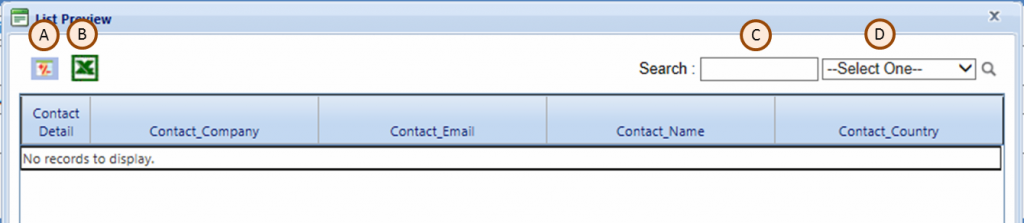
- In the List Preview window (screenshot above) that opens you can modify the columns shown by clicking the (A) Add/Remove Columns button. Click the (B) Excel button to export the list to a worksheet. If there are certain people who you would expect to be in the list, or not be in the list, you can quickly verify their presence in the list with the (C) Search field. Enter the search information and then, in the (D) Select One dropdown, choose the column (field) to search. Click the (B) Excel button to export the list to a worksheet.
- Do a thorough job of reviewing the results from your list to ensure you have included all the desired recipients and no undesired recipients. If the list is not returning the desired results, adjust your criteria and repeat the preview and verification process.
Where is the list being used
Also on the Target Summary Screen, the (4) Automation process using this list and (5) Email Only Project using this list sections list where your target list is being used and will warn you when an existing list is connected to other activities. This is important if you modify an existing list as your count could change dramatically depending on the criteria you select. In this case since you created a new list, these sections are blank.