Making the Process Live

Steps to Turn the Process On

Once testing is completed you can turn your process on. The following steps walk you through this step.

  1. In Automation, Click on the process name on the left side of  your screen and Edit Process (1) after the process is opened.AutomationSummaryEditBar
  2. Click on Reset Count (2) at the top of the screen.
  3. Click the Save button (3) at the top of your Edit Process Screen.
  4. Open each Prospect Email in your process and remove name token (the ::Name:: code) from subject line of emails. To open your prospect email click on the process name and each of the white envelopes on the left side of the screen. Each envelope represents a prospect email.
  5. Click on the Landing page icon on the left side, blue bar, and click “Clear Data Log
  6. Click on the Process Name on the left side of your screen.
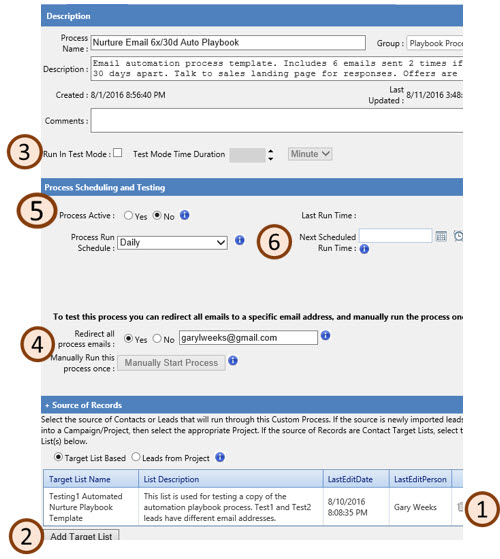
  7. On the Process Summary Screen, remove test list (1), by clicking the trash can next to the list name on the screen
  8. Click Add Target List (2) to add your created Target List for this process.ProcessSummaryScreen
  9. On the Process Summary Screen, take the process off of Test Mode (3) by unchecking the test mode check box.
  10. Under Redirect all Process emails (4) change the radio button to No and remove the override email address
  11. Change the process to Active=Yes (5) by clicking on the radio button by Process Active
  12. On Process Run Schedule (6), select Manual Execution Only.
  13. Set a Next Scheduled Run date and time (6) under the Next Scheduled Run Time box
  14. Click Manually Start Process button (4).
  15. Click Save Changes at the bottom of the Process Summary screen

Once the process has started you will see numbers appear in the Start Block and the first Action Block, a wait block, in your process. The wait block is there so that when a process is started with a target list you can see how many names will be processed. The count that you see should be slightly less than the target list as a name could be suppressed via the suppression list. If the count looks extremely high you can stop the process by changing the process to Not active. You do this by Opening the Process Summary screen and selecting Process Active No and select Save changes.

If you have carefully created the target list and checked the counts then once you have started the process the count should be correct and you will not have issues.

Your Final Step

If your lead counts look correct, on the Process Summary page

  1. Change the Process Run Schedule from Manual Execution Only to Daily
  2. Set a Run Scheduled Date and Time 
  3. When you are done Click Save at the bottom of the screen.
Copying and Editting a Target List

Although it is possible to create a target list from scratch we have simplified the process and created a template for you. Utilizing the template will allow you a start on your list with the ability to just make edits, simplifying the process. We recommend you copy the  List Template, do not edit it!

Copy the Target List

  1. Open the Target List application (click on the text Target List in the top blue bar in the Marketing Resource Center)
  2. On the left side of the screen open the TargetGroup “List Templates”
  3. Right click on Automated Nurture Playbook Template
  4. Left click on Copy List
  5. You will get a pop up that says “Automated Nurture Playbook Template is Copied to your ClipBoard”, Click OK
  6. Right click on the Target Group that you want to paste the list into. We recommend Pasting your list into the group “Automated Nurture Lists”  Left click on Paste List in the pop up.
  7. A pop up message will appear that says “Do you really want to paste…” Click OK to complete the paste process
  8. The list will be copied in the TargetGroup you selected. The list name will appear as “Copy of Automated Nurture Playbook Template”
  9. Left Click on your new list in the blue bar, the list summary will appear on the right side of the screen in the Target Summary
  10. Edit the List name, update the description and comments, finally click Save.


Edit the Target Definition

The next step is to update the target definition for your specific project. The list template includes all the default features that we think you may need. This process allows you to add specific groups of names to the list and have certain names excluded. Any of the defaults can be removed but we anticipate you will want to add criteria and leave the defaults in place.

The defaults that are included in the list template and can be seen in the list are summarized below:

  • Country (United States and Mexico)
  • Last Email Opened (meaning the contact opened an email sent them in the last year)
  • Import Date (when was the lead added to the system)
  • Unsubscribe (eliminate anyone that has opted out of these communications)
  • Competitors are Removed
  • Invalid emails are removed
  • Internal Contacts are removed
  • Media Contacts are removed
  • Specific Countries are removed

The final step is to add names to your list as desired. The template is set up so that you should have to add criteria to add in the contacts you want to contact. You will want to edit the first option, Lead/Contact Value, List_Source. This line item was set up for the template and meant to be edited for your purposes. The Criteria Type Definitions are defined here. That site defines how to create a list, you will find useful information on your list creation. The Criteria Types are defined.

When you are done adding criteria to your list, click Save at the bottom of the screen. On the Target summary page you can calculate the list count as well as preview the list of names generated. You can keep modifying the list as necessary until you are getting to the appropriate name or counts and list of names you want to target.


Enter Email Content

The email templates from the process you copied are in the newly created process. Edits can be made to the made to the emails in the new automation process and will not affect the original process.

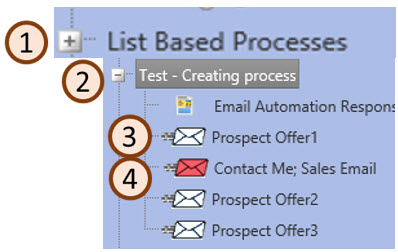
In Automation click the plus next to the Process Group (1) where your new process resides. Click the plus by your new Process (2). You will see the icons indicating the attached landing pages, and the email templates. The white envelopes are the prospect template (3) the red envelope is the sales email (4).ProcessEmails

First add the content to your Prospect emails

  1. Click on the first white envelope in the list, on the Email Summary tab edit the Document Name. It should be a name that makes it clear on the purpose of the email.
  2. On the email summary screen the subject line should also be listed. This is the subject line seen by the customer
  3. When you are testing the process we have found that it is helpful to start the subject line with ::Name:: followed by the actual subject line. That is you will know which email you are testing and the steps you want to follow based on the testing template. This template will be discussed later.
  4. If desired you can also edit the from address, from name, reply to email and reply to name. The values in these fields are copied from the email template but can be edited.
  5. After your edits are done on the Email Summary tab click Update.
  6. Click the Edit Email tab to modify the content. The templates are email wireframes so you just need to enter the text, insert webinars and hyperlinks. The templates are designed so there is a draft of the content which should help to give recommendations on the content that can be entered. You can completely change the content, the draft is just a recommendation.
  7. If you are linking to a landing page in your email template with list based processes make sure to add the “copied” function.
    • The purpose of the Copied is function is so that you will create a new lead, since you will need a new lead created and added to your project. If you update an existing leads you won’t be able to track the lead results in your project.
    • When you are linking to the landing page make sure you know the correct Landing page id. If you are utilizing the link function to find the landing page you will be fine as the tool will point to the page in your Campaign/Project. You can also verify the URL with the one you wrote down when you were editing the landing page.
  8. When you are done make sure to click the Update at the bottom of the screen
  9. Test the email from the Email Summary tab. If you need additional instructions on how to test the email message view this page. The main goal here is to make sure the content is correct, links are correct and open to the right pages.

Enter Project content into your Sales Email

The sales email is a standard sales email. It is set up so it should work with all your projects, you won’t need to add general detail. If you want to add special instructions or change the basic content of this email you can to the sales email in Automation. You cannot edit the sales email in Campaign Management. You will need to add a source description, we recommend we do this in the project found in Campaign Management.

Updating the Source description

The simplest method is to enter your source description to the project in campaign management as that content will copy over to Automation. To do this click on Campaign Management at the top of your screen, find your project expand it by clicking on the plus next to the project name, click on the “Source Description” text in the blue bar on the left side of the screen. Type your content into the Source Description box. The Source Description can be added to replace the :$:Source Description:$: code on the sales email in automation. However you don’t need to what is in the project will copy over to Automation.

There is a draft source description in your project in campaign management. Using this should help you determine what things you may want to include in your description. You can find more details on what to put in a source description and where to add it here.

Editing a Landing Page

The landing pages from the process template you just selected to be copied will be copied to your newly created process. The good news is you don’t need to start from scratch you can utilize these templates for your new process.

So what is next?

  1. Where can I find my pages? The landing pages to edit for your new process will show up in the newly created project and in the newly created process. The pages are the same just accessible from both places. You can change the content in either place.
    • To find the page in Campaign Management click on the Project Name on the left side of your screen and click on the plus sign
    • If you do not see your project change the filter on the top of the screen from Active Projects to all Projects and click Filter Project to see more options
    • Click the plus on your Project Name to see the Landing Pages. Landing pages have the familiar yellow and blue icon.
    • When you open the project you will see the Source Description as the final item on the list. In the next step when you are editing content you will be adding this Source Description.
  2. Write down the URL of the landing page – You will need this when entering your email content.
  3. Rename the landing page to match your process name – This will help in eliminating confusion later and make sure reports are clearer
  4. Is editing a page in a process different than editing a “normal landing page”? No making edits is the same as any other time you would make edits to a landing page. To make your changes, open the landing page and make the necessary edit changes. If the page is a custom page then follow the editing rules of changing a custom html landing page. If your page is utilizing a wireframe and you need help with adding content or making edits then follow landing page wireframe editing standards (look at step 3 and below).
  5. If you need to completely change the content or want to change the look or the page do not delete the page. The easier path is to either completely remove the html on the landing page and the thank you page and paste in the new content. Or you can change the landing page wireframe, this can be done on the landing page summary. Sometime changing the landing page wireframe after one is already attached to your landing page can confuse the browser so if you have problems please contact your project manager.
  6. Do not forget to change the thank you page content. You want to make sure you are pointing to correct offer. As a reminder you can change the text on the download button when adding a hyperlink.
  7. The final step is to test your landing page. Since the page copied is a working page the most important thing will be to review the content. Instructions on testing landing pages can be found here.

Note that if you are linking to a landing page in your process make sure the link in the email is utilizing the “copied” function. This function will ensure a new lead is created for anyone that clicks submit on the landing page.