Setup Landing pages for Custom Processes

The landing pages from the process template you just selected to be copied will be copied to your newly created process. The good news is you don’t need to start from scratch you can utilize these templates for your new process.

So what is next?

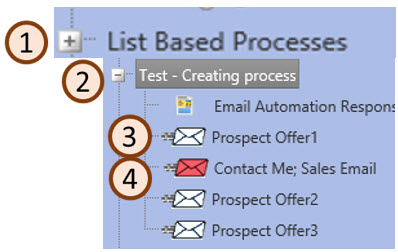
  1. Where can I find my pages? The landing pages to edit for your new process will show up in the newly created project and in the newly created process. The pages are the same just accessible from both places. You can change the content in either place.
    • To find the page in Campaign Management click on the Project Name on the left side of your screen and click on the plus sign
    • If you do not see your project change the filter on the top of the screen from Active Projects to all Projects and click Filter Project to see more options
    • Click the plus on your Project Name to see the Landing Pages. Landing pages have the familiar yellow and blue icon.
    • When you open the project you will see the Source Description as the final item on the list. In the next step when you are editing content you will be adding this Source Description.
  2. Is editing a page in a process different than editing a “normal landing page”? No making edits is the same as any other time you would make edits to a landing page. To make your changes, open the landing page and make the necessary edit changes. If the page is a custom page then follow the editing rules of changing a custom html landing page. If your page is utilizing a wireframe and you need help with adding content or making edits then follow landing page wireframe editing standards (look at step 3 and below).
  3. If you need to completely change the content or want to change the look or the page do not delete the page. The easier path is to either completely remove the html on the landing page and the thank you page and paste in the new content. Or you can change the landing page wireframe, this can be done on the landing page summary. Sometime changing the landing page wireframe after one is already attached to your landing page can confuse the browser so if you have problems please contact your project manager.
  4. Do not forget to change the thank you page content. You want to make sure you are pointing to correct offer. As a reminder you can change the text on the download button when adding a hyperlink.
  5. The final step is to test your landing page. Since the page copied is a working page the most important thing will be to review the content. Instructions on testing landing pages can be found here.


Edit Custom Process Logic

The Process Templates are designed so you should not have to make any changes to the actual process. You will only need to edit the Prospect and Sales emails as well as the Landing pages. We would like to overview how the processes work and what each block does just to help you understand what the process is doing.

The automation processes use the Microsoft product Silverlight if you don’t already have this installed you will be prompted with a message and an option to download it. We have noticed that processes are easier to edit Internet explorer, but it can be done as well in Chrome or Firefox.AutomationBocks

First step lets explain the different types of blocks and what they can do

  • Start Block (1) – This round block indicates where the process starts
  • Action Block (2) – This rectangular block is used when you want to add an action, to make something to happen at this step. Actions are things such as the sending of a prospect or sales email, adding a value to the lead (for example a lead grade). You can also add a wait time if you don’t want the action to take place immediately, i.e. add a delay in the process. A good place to add an action block with a wait time is right after the start of the process so you can see the count of the leads affected at the beginning of the process, before any action is actually taken.
    • If an action block is showing with a bold line around it, this is indicating the block is a merge block. Merge blocks connect sections of the process and help the process run smoother. If merge blocks are necessary they will be in your process template.
  • Decision Block (3) – Used when you want to create a yes/no branch. For example the block make look to see if a previous email has been opened, if a lead is graded cold, or if an email was opened. This is done so the next step will be different depending on the answer the decision block.
  • Comment Block (4) – Just like it sound it is just comments, notes on the screen to remind you what is happening at different stages, add as many as you like with lots of details, as it will save you confusion in the long run.
  • Connectors (5) – straight lines and angled lines (When you add a line to your process you will have a choice for a line or a Polyline) When you right click on a line connecting two blocks choose modify in the drop down shown you can select to change the line from a straight line, the default, to a polyline (a line with bends in it.)
  • End Block (6)  – the end block tells you how many people have finished the process.

Modifying your Copied Process

To view the contents of a block double click or right click and choose modify to open and view the contents of any block. If you don’t want to make changes click close otherwise make your necessary changes and click OK to save any changes required. You will notice we recommend making the description on the blocks as detailed as possible. For example, if there is a delay in the process it is helpful to put it in the subject line. This helps so you don’t have to repeatedly open blocks to determine their purpose.

To move one block at a time

  1. Left click on any block
  2. Hold down your cursor and move the block to its new location

To move several blocks at once

  1. Left click, hold and drag your cursor over a group of blocks
  2. A yellow box will appear and size to cover a group of blocks and their connectors as you drag your cursor
  3. Lift your cursor and the selected blocks will be yellow
  4. Left click on one of the yellow blocks, hold down your cursor to move the group of blocks on the page. For example you can drag the group of blocks down the page to spread out your process or add additional blocks to the page.
  5. When you are done click somewhere else on the page to remove the yellow from the blocks allowing each block to be moved one at a time.

To copy a group of blocks

  1. Left click, hold and drag your cursor over a group of blocks
  2. A yellow box will appear and cover a group of blocks and their connectors as you drag your cursor
  3. Lift your cursor and the selected blocks will be yellow
  4. Right click on one of the blocks and choose copy
  5. Right click choose paste
  6. Your pasted clicks will still be yellow so you can click on one of the blocks and move the set on the page
  7. When you are done click somewhere else on the page to remove the yellow from the blocks.

To remove/add or modify a connector line

  1. To remove an existing line, right click and choose delete. You will get a pop up confirming you want to delete the object, which you have to click OK to continue.
  2. To add a new connector, left click and drag your cursor between the dots in two blocks. When you release the line will appear.
  3. To change an existing straight connector line to a bent line, right click and choose Modify. The pop up appears that allows you to change the type of line from Line to Polyline. Click OK when you are done. A dot will appear in the middle of your line which allows you to add “bends” in the line. Drag the dot in the middle of the line to change the angle.

To save your changes click the SAVE button at the top of the page.

If you don’t want to save your changes click the Process summary tab and the changes you made will not be saved.


Edit Content in the Prospect and Sales Emails

The email templates from the process you copied are in the newly created process. Edits can be made to the made to the emails in the new automation process and will not affect the original process.

In Automation click the plus next to the Process Group (1) where your new process resides. Click the plus by your new Process (2). You will see the icons indicating the attached landing pages, and the email templates. The white envelopes are the prospect template (3) the red envelope is the sales email (4).ProcessEmails

First add the content to your Prospect emails

  1. Click on the first white envelope in the list, on the Email Summary tab edit the Document Name. It should be a name that makes it clear on the purpose of the email.
  2. On the email summary screen the subject line should also be listed. This is the subject line seen by the customer
  3. If desired you can also edit the from address, from name, reply to email and reply to name. The values in these fields are copied from the email template but can be edited.
  4. After your edits are done on the Email Summary tab click Update.
  5. Click the Edit Email tab to modify the content. The templates are email wireframes so you just need to enter the text, insert webinars and hyperlinks. The templates are designed so there is a draft of the content which should help to give recommendations on the content that can be entered. You  can completely change the content, the draft is just a recommendation.
  6. When you are done make sure to click the Update at the bottom of the screen
  7. Test the email from the Email Summary tab. Your main goal is to make sure the content is correct, links are correct and open to the right pages.

Now it is time to click your Sales Email

The sales email is your standard sales email. It is set up so it should work with all your projects. If you want to add special instructions or change the basic content of this email you can. A sales email in the campaign management should not be edited, but in automation if you want to edit the content of the basic email it can be edited and will not affect any other sales emails.

The Source Description can be added to replace the :$:Source Description:$: code on the sales email in automation. However if you do put a source description here you have to also enter it into the Source description on the project in Campaign Management. Thus the simpler method is to enter your source description to the project in campaign management as that content will copy over to Automation. To do this click on Campaign Management at the top of your screen, find your project expand it by clicking on the plus next to the project name, click on the “Source Description” text in the blue bar on the left side of the screen. Type your content into the Source Description box.

There is a draft source description in your project in campaign management. Using this should help you determine what things you may want to include in your description. You can find more details on what to put in a source description and where to add it here.

Copy Custom Automation Process and Create a Project

The first set is to choose a process to copy from the templates available and create a project where leads generated from the process will be placed. The good news is this is menu driven and can be done in one step.

  1. The first step is to open the Marketing Resource Center, choose Automation from the tool bar on the top of the screen. The tool bar referenced is immediately below the logo and the Marketing Resource Center title. It says Tools, Database Campaign Management, Scoring, Automation, Target Lists etc. Choose Automation.
  2. In the blue bar on the left side of the screen click on the plus next to the group name: Playbook Process Templates by doing this you will see the processes in the group. These processes are templates an in place as a starting for your automation processes.
  3. To view the processes click on the process name. The description of the process is shown the right side of the screen after you click on the process name. Under the process name is a description of the process this will help if you have questions on which process to choose. If you click the Edit Process Tab you can view the process and the details of what is included.
  4. Right Click on the process name in the blue bar on the left side of the screen that you want to copy. When you do this you will see a pop up box that says Copy Process Delete, Process or Add Template. Left click on the Copy Process option.
  5. A pop up box entitled Copy Process will appear. A screen shot of that pop up window is shown on the right.
    • First choose a Process Name for your new Process Name and place it in the New Process Name box (1)
    • Select a Process Group from the drop down where you would like to place your copied process (2)
    • Enter a Name for the New Project where the leads will be tracked. The project name should be clear and concise but detailed enough so if you went back and looked for it a year from now you could find the project easily. (3)
    • Select a Campaign from the Campaign Name drop down to list where you want your new project placed. (4)
  6. When you are done with the above steps click the Copy Process and Project button. (5) Click cancel copy if you changed your mind or no longer want to copy the process and create the project.
    • If a missed one of the four fields necessary to copy the process and create the new project you will get a red message at the top of your Copy Process pop up window. The message will tell you missed a required field and which one. If this happens enter the missing information and click the Copy Process and Project button again.
    • Do not click the Copy Process and Project button twice. Look at the tab button to see if there is a scrolling icon this will tell you the process is still being copied and the project being created.
  7. When the process is copied it will appear on your screen open on the right side of your screen.
    • On the process summary screen make sure the process is not active. There is a radio button in the middle of the screen, Process active yes or no, confirm it is set to no.
    • Next edit the description and comment on the process summary tab top of the screen. It is important to keep the description clear and up to date. This will help you in the long run keep track of what the purpose of the process is.
    • Finally click the Save Changes button at the bottom of the screen.
  8. Next click on the Campaign Management at the top of the screen. (The tool bar is described in step 1)
    • On the top left side of the screen change the drop down to “All Projects” and click the Filter Project button.
    • Open the project in Campaign management. To do this you will need to click on the plus by the campaign name.
    • Click on the project name to open the project on the right side of the screen.
  9. Click on the word Source Description (A) to enter the project leads details for your sales people. This is the same description you used in the custom process under Automation. When you are done click Update on the Source Description window. The project does not have to be opened and resaved. Now you are ready to go to the next step and enter the content for your landing pages used in the process.

you are ready to go to the next step and enter the content for your landing pages used in the process.

Plan Editorial Schedule

As you in the planning stages for your email drops it is a good idea to create an editorial schedule to outline what topics you want to cover and what materials and offers you have to tell that story. Then lay out the desired dates for each email drop, no matter what the drop schedule is, monthly, bi-monthly or weekly, and fill it in with the topics and materials necessary for the drop. This will help to ensure you are getting the coverage on all the areas of business you want included. As well as uncover gaps in the schedule and indicate where new content or offers are necessary.

Consider the timing of outside events are happening in your industry when building the schedule. It is a good rule of thumb to include deadlines to keep everything on track. At a minimum enter specific dates for the next two-three months, to help determine deadlines. The calendar can include a content schedule for a year or even more just realize that it will need to be flexible as the business goals may change and the content may need to be altered along with these changes. GrowthPoint can help you create content and offers the first step is to determine what is needed and the approximate timing of those needs.


Define Target List

Create and Manage a Target List

In this step, you will define the recipients for a mailing by selecting the desired parameters. Before you start entering your list criteria, you should spend some time noting the who you want to include, and exclude, from your list. Think about the traits or criteria you will use to generate a target list that will put you in touch with the right people.

About Target Lists

In LeadCentral, you do not actually create a list of recipients for your emails and newsletters. Instead, you establish a list of parameters that define who should receive the email. The list of parameters available is extensive, allowing you to exactly define recipients. You can include list parameters to both include people as well as exclude people.

When you are ready to distribute your mailing, LeadCentral evaluates the list of all possible email addresses in the database(s) based on the parameters you entered and returns the list of only the recipients specified. Creating mailing lists using this dynamic approach ensures that recipient information is always current and that you reach the desired targets.

Create a Target List

  1. From the Marketing Resource Center, click the Target List tab. From the Custom List navigation pane to the left of the screen, navigate to the Group that you want to add a list to. Right click on the Target Group name you want to create a list for and, from the popup menu, select Add List. In the List Name enter a descriptive title that will help you and others identify the list in the future. You must also fill in the List Description with additional information. This could include details about the target audience and specifics about inclusions or exclusions. Click OK. You will see the Target Summary tab, on the right side of the screen, which be explained later in this process.Create_a_target_List
  2. Click the Target Definition tab to begin adding criteria for your list. Click Add New Criteria. Under the (1) Criteria Type Definition, click the Select Choice dropdown. From the list, you have the following criteria type to choose from:
    • Lead/Contact Value: This is the most-frequently used Criteria Type. It includes two types of fields, standard and custom. Standard fields are the headings you will find in any database of contact information. Custom fields can be created by you based on your unique contacts, leads or sources. Custom fields are indicated by “(Custom)” next to the field name. To view the available fields, begin typing a few letters of its name and all of the available options will be displayed.
    • Campaign/Project: This selects contacts inside a specific project or set of projects or an entire campaigns contacts. Check the campaigns or projects you want to include. The option to exclude specific projects is being added.
    • Keyword Clicks: This option allows you to find the list of contacts that are interested in a specific topic. The feature will find any link name with that keyword. The link can be located in a landing page or a prospect email, so any link clicked. Thus you can see the importance of labeling your links carefully. When choosing this option you can opt to include all projects or limit to specific prospects.
    • Email Activity: This options let you choose a email template and results based on the users interaction with the template. For example was the email opened or was a specific link clicked.
    • Landing Page Activity: This selects recipients based on the fact that they visited a specific landing. After including this criteria, you will need to identify from a dropdown list the landing page you want to include. And finally what action the user took with that landing page, for example everyone that opened the page, submitted it or clicked on a specific link.
    • Score Results: A contact’s score is a numerical value calculated for them based their behavior and interests over time. More detail about Contact Score is available from GrowthPoint.
    • Existing Target Lists: This option allow you to imbed a target list inside of your list. The reason this is valuable is there are often a set of criteria that are used in multiple lists (for example North America Valid Contacts). By imbedding a list inside a list you don’t have to repeat that criteria each time it is utilized in a new list. And if the criteria changes you only have to change it once. For example if the imbedded list is a listing of competitor email domains to exclude you can add to the competitor list in one location and the list will be updated in every place the Existing Target List is utilized.


Define criteria

In the (1) Criteria Type Definition column, click in the dropdown button and select a Criteria Type. Depending on the Criteria Type selected, you will have a list of options in the dropdown menu(s) under the Criteria Type Definition and the Operator/Action columns.

    • If you select Lead/Contact Value, you will get a new field in the (1) Criteria Type Definition column. Begin to type any part of the name of a desired data field and you will see a list of the fields that contain that text. For example, entering “cust” will show the list of all fields that include the words: customer, customer interest, top customers, qualified customers, etc. Under the (2) Operator/Action column, you will need to select the operator, such as Equal To, Greater Than, Is Part of List, etc. You will also have a field under the (3) Value column where you will enter the desired value for your selection criteria for that data field. Click on the magnifying class icon to the right of the field to see the available values in the selected field. You can choose from the list or type your criteria into the field. There is a limit of 2500 characters in this field. Under the (4) Applies To column, specify whether this criteria applies to Contacts, Leads, or both. (See below for an explanation of the difference.)
    • If you select Campaign/Project, you will get a new dropdown in the (2) Operator/Action column where you can select the campaign or project. Under the (4) Applies To column, the system will default to Lead.
    • If you select Keyword Clicks, select all projects by clicking on the checkbox next to ALL in the Select Project Drop down. Under (2) Operator/Action, you will get a drop down to select the operator. This options defaults to All (for the date field) and Is Like for the operator (the other option is exact match). Enter your keyword(s) under the (3) Value column for your selection criteria
    • If you select Email Activity, choose whether the email was created as part of a campaign or an element of an automated process. This selection will navigate you to where the template is stored. Under the (2) Operator/Action column, you will need to select the action the recipient took. For example, you can include recipients who simply opened the email or clicked on certain links. Under the (4) Applies To column, specify whether this criteria applies to Contacts, Leads or both. (See below for an explanation of the difference.)
    • If you select Landing Page, you will get a dropdown where you can select the desired landing page. A new field will appear with a directory of the Campaigns and Projects that include a landing page. Only projects with landing pages will appear in your list. Navigate to the desired landing page and select it. Under the (4) Applies To column, specify whether this criteria applies to Contacts, Leads or both. (See below for an explanation of the difference.)
    • If you select Score, you will get a drop down to select the scored item or trait. Under (2) Operator/Action, you will get a drop down to select the operator. This will typically be the Numeric operator “Greater Than.” You will also have field under the (3) Value column where you will enter the desired value for your selection criteria, which is typically the minimum Score you want included as your selection criteria. Click on the magnifying glass icon on the right of the field to see the scores available. Under the (4) Applies To column, specify whether this criteria applies to Contacts, Leads or both. (See below for an explanation of the difference.) Additional information about Scores is included in another section of this help system.
    • If you select Existing Target List, you will get a new dropdown in the available lists, any list can be selected however it is a best practice to keep frequently used criteria in a folder, for example System Target Lists. In the Target Summary you will see a listing of Other Target Lists(s) using this target list. Anytime a list is updated if it is used as part of another lists criteria the data will be updated in original list and all the Target lists it is a part of. You can save a lot of time by utilizing this option, version retyping a set of option multiple times in a variety of lists.


Definition of a Lead Vs Contact

Under the (4) Applies To column, in the dropdown menu, select whether the selected criteria applies to only the contact, only the lead or both.

  • contact is a unique person in the database. For example, there can be only one contact Sam Smith at Stellar Supply Company. When a new lead is generated, the system looks for the related contact. If the contact exists, the lead is attached to the contact. If there is no contact matching the lead, then the system creates a new contact and attaches the lead to it. There will almost always be more leads than contacts. Contact records hold only location (address, phone, company, etc.) and other demographic information. They do not include any information related to campaigns or projects. That information is contained in the lead(s) attached to the contact.All of a contact’s activities are logged within the system. If new leads are generated from that contact, the contact record is updated with new or changed data, like address, phone, title, etc.. The new lead is also linked to the contact record.
  • Leads are generated every time a person responds to an offer. For example, Sam Smith requests a white paper by filling out a landing page, attends a tradeshow or registers for a webinar, that generates a new lead. Each lead is graded, and that grade determines if the lead will be passed on to Sales. Typically Hot and Warm leads are sent to Sales for follow-up. Nurture-graded leads are not sent to Sales; they simply document the individual’s responses. Example, just downloading a white paper is doesn’t warrant forwarding the lead to Sales. Instead, the lead is graded Nurture and can be added to target lists for further nurturing and qualification. Leads are typically viewed by Sales via the Lead Detail page.. The link to the Lead Detail page is immediately emailed to the assigned sales person when the lead is generated. Leads can also be viewed via the Lead Resource Center or Marketing Resource Center.

Add more criteria

After adding a criteria, click the (6) Add button to add the next criteria or click Save to save your criteria and move to the next step. You can continue adding criteria to further define your target list by clicking the (8) Add New Criteria button. If you need to nest a new criteria between existing criteria, click the (6) Add button to the right at the point where you want to insert the new criteria. Click the (9) Save button to save your work as you go, and when you done creating your list. To delete a criteria, click the Trash icon near the (6) Add button. When you are done entering criteria, click Save.

Order of operations

You can specify an order of operations by using the parentheses symbols on either side of the Target Definition screen. Just as in math, you can group several criteria so that they are all processed together before the system moves on to process the next criteria or group of criteria. Insert (5) parentheses to indicate how the criteria should be grouped. Also note that you can use the (7) And/Or dropdown to specify how criteria in groups will be processed. When you are done working with you criteria, click Save.

Check target list recipients

Target_Summary

  1. After clicking Save, you will see the Target Summary tab. This is where you can do a quick check of the number of recipients in your list. Recall that the system dynamically creates the list each time it is run. Since this is a new list, the number of (1) Unique Contacts shows 0. Click (2) Re Calculate Count to run your list and determine the number of recipients.
  2. Before using a list, it is very important to preview it and ensure it includes and excludes the desired recipients. To verify the contents of your list, click (3) Preview to see the recipients.List_Preview
  3. In the List Preview window (screenshot above) that opens you can modify the columns shown by clicking the (A) Add/Remove Columns button. Click the (B) Excel button to export the list to a worksheet. If there are certain people who you would expect to be in the list, or not be in the list, you can quickly verify their presence in the list with the (C) Search field. Enter the search information and then, in the (D) Select One dropdown, choose the column (field) to search. Click the (B) Excel button to export the list to a worksheet.
  4. Do a thorough job of reviewing the results from your list to ensure you have included all the desired recipients and no undesired recipients. If the list is not returning the desired results, adjust your criteria and repeat the preview and verification process.


Where is the list being used

Also on the Target Summary Screen, the (4) Automation process using this list and (5) Email Only Project using this list sections list where your target list is being used and will warn you when an existing list is connected to other activities. This is important if you modify an existing list as your count could change dramatically depending on the criteria you select. In this case since you created a new list, these sections are blank.


Setup landing Pages

In this step you will customize the landing page for the specific offer. Before starting this step, determine what the offer will be and how its value can be “sold.” When the visitor reaches the website, they need to see the value in taking the time to complete the page and request the offer.

In the Campaign list to the left of the screen, find the project and click on the landing page you want to edit. Landing pages are designated by a blue and yellow page icon and the page name you provided when the page was created. The page will open on your screen on the right to the Landing Page Summary Screen.

To simplify the process of creating a landing page you can utilize a landing page wireframe. This is the template which has the outline and design all fixed and set-up for you with text boxes where you can add your content. A huge benefit of utilizing a landing page wireframe is the design of the page is set and by a click of the button you can open a text box to add your content, you do not need to create a design, write or edit html or choose a font size or font type that is all pre-set for you. The form fields are set and do not need to be modified in any way. Specific fields that needed based on the page type are already there for you. For example Country must be included if someone is opting into a newsletter and if you have specific information that needs to be collected so the leads are graded appropriately those fields are included in a lead generation page. There are several different templates to choose from, sales lead, nurture lead, pages with and without images. The templates are named so it is clear which ones are to be used for a nurture campaign vs. which templates you will want to select when you want a sales lead created.

So how do you create a landing page using a wireframe template?

  1. Add a landing page to your project by choosing the option “Add New Landingpage” option. If you need more details on creating a project or adding a landing page to a project click here.
    • You can choose to copy an existing page if so desired. If the original page is a custom page the html page will be copied over. If the page you are choosing to copy is in a wireframe then the wireframe and its current content will be copied.
  2. Click on the Landing Page Summary and choose Wireframe in the Landing Page Creation Method section. When you do this you will see the wireframe available. Your choices are in folders and named clearly so you can tell the purpose of each option. If you are not sure which option will best meet your needs, contact your project manager. Do you need help choosing a Landing page Wireframe? The naming structure explaining how to easily determine the purpose of each wireframe is outlined here.
    • If you determine you want a different Landing Page wireframe it can be changed. If you change wireframes you will loose any content you have entered. We recommend that you delete the landing page from the project level and start over as this will make sure you have no browser caching issues that will cause your page to not look right. After you delete the page start back at step 1 adding a new blank page.
    • In the Edit Landing Page tab as well as on the Landing Page Summary you can see the name of the wireframe you have chosen. (1)
    • There is an image of sample landing page wireframe shown on the right, in this sample there are images included. (3) Not all wireframes include the option for images.
  3. Next step is to add your content. To start click on the Edit Landing Page Tab. Adding content to a Landing Page is the same as adding text to a Email Wireframe. There are details below, however you can also find more information on adding text here. A screen shot of a sample landing page is shown to the right.
  4. On the Edit landing page tab click each text box to open the Dynamic Section pop up and add your text. (2) There are separate text boxes for each type of content, the headline, subhead and body text. When adding text the font size and type is preset for you all that is necessary is for you to add the content, however you are able to bold, underline, indent add bullets and hyperlinks if you so choose. After entering your content into text box click save (the button is at the bottom of the Edit Dynamic section popup box) and after all the content for you landing page is entered click update at the bottom of the landing page.
    • If you want to copy the text for the page from a word document you can, it is recommended that you paste the plain text into the wireframe. You can also copy the text from a different landing page. In this case it is recommended that you open the page in a browser that you want to grab the content from. They copy the desired text and paste as plain text in the new landing page wireframe text box.
    • To paste as plain text, copy the desired text then right click in the Dynamic section popup (that opens when you want to add text) and choose paste as plain text from the drop down.
  5. Does your page have editable images? If so you will see gray boxes on your landing page wireframe. (3)When you hover over the image the cursor will change to a pointer hand. Click the image placeholder to view the document manager will appear, you can upload new images or select one from the library. If you need more detail on how to use the Image Manager click here.
  6. The form fields are set (4) and will map to the appropriate fields in the live system. These fields are not editable. If there are fields you need on your wireframe that are not there talk to your project manager who will be able to determine if there is a better template to use or if a new wireframe is necessary.
  7. After entering text for your Landing page the next step is to enter content on your thank you page. To do this click on the Edit Thank You Page Tab. Just as you did on the landing page click each text box section and add and save your content.
  8. Do not forget to add a link to your offer (if there is a downloadable offer) in the “Download Now” button.
    • When you click on the button you can change the text in the pop up window. To do this simply type over the existing text and click save.
    • Next click on the Hyperlink icon in the Edit Dynamic Section window. The Hyperlink Manager window will open, allowing you to create the link to your document. How you create the link depends on where the offer is stored.
    • Document stored in LeadCentral:  Click this option to see a menu of folders where the offer could be stored. Navigate to the correct folder and select your offer document. In the Link Name field, label the link with the name of your offer. Leave the other fields at their default and click OK.
    • If the document isn’t stored in LeadCentral and you do not plan to take advantage of LeadCentral’s ability to track and report downloads, select  In the Hyperlink manager window select, Manually enter URL. Enter the URL and the Link Name, then click OK.
    • To link to a document stored within LeadCentral that has not yet been uploaded, first the document must be uploaded into the Document manager, click the (2) Document Manager icon. When the window opens select the folder to add your document to, or create a new folder and then select that folder. Click Upload at the top of the screen, click select and find your file for uploading. It is a best practice to not have spaces in the document name. After your document is selected click Upload at the bottom of the screen. You can upload multiple documents at one time.
    • After the item is uploaded highlight the text that you want to link to and click on the (1) Hyperlink Manager icon, select the radio button for Link to a document stored within LeadCentral. Select the document you have just uploaded, you should enter a Link Name. This is not mandatory, just a best practice. Click OK when you are finished.
  9. When you are done with your Thank you page edits make sure you click the Update button at the bottom of your page to save your changes
  10. You are not done yet. The last step is to test your new page. It is very important to review and test the landing page. Proofread the text to be sure it accurate and grammatically correct. If you are using a Landing Page Wireframe you will save yourself some time in testing since the look and feel of the page (in a variety of browsers) as well as the field names are already tested and mapped correctly. There are several ways to test the page and you can read about the process in detail here.

Alternatively you can create your own page

An existing page can be copied or you can start with a blank page and enter all your own HTML. If you copy an existing page we recommend that you choose a template from the Master Custom Landing Page Templates Campaign.

  1. If you are changing content/or adding content to a copied Customer Landing Page Template begin by clicking on the Edit Landing Page tab to view your landing page. Highlight the text you want to edit. We recommend changing a paragraph/line at a time. For example, first highlight the Headline and make the necessary change, then highlight the next section and make those changes.
  2. The format of the text is built into the page, so new text you enter will format automatically. The form fields on Custom Landing Page templates are set and will not need to be modified.
  3. When you are done making your text changes, click Update at the bottom of the page. If you forget to save you changes, you will get a reminder message. If you do not want to save your changes, click Cancel.
  4. Edit the Thank You Page. To do this, click on the Edit Thank You Page tab at the top of the screen. Make changes to the text using the same process used for changing the landing page text. HyperlinkandDocumentMgr
  5. It is critical to remember to add the hyperlink to  your offer on the thank page. There are instructions above in step 7 above in the instructions on using a landing page wireframe if you are looking for more detail on creating a hyperlink.
  6. Click update to save the changes you made to the Thank You page.
  7. Don’t forget to test your new page. When creating a page from scratch it is important to view the page in several different browsers or use a tool such as BrowserStack to see what a page looks like in a wide variety of situations. Pages can look dramatically different in different browsers which is why we encourage the use of wireframes as all these factors are already tested. To test your landing page you can follow these tips.

Advanced features are available on all types of landing pages

On the Landing Page Summary tab you will find a variety of advanced features that allow you to add special handling to your landing page.

Landing Page Advanced Features

Landing Page Advanced Features Window

To reach these click on the Advance Feature button on the landing page summary tab. The options available include:

  • Redirect URL: Redirects the user to a new URL after he/she clicks Submit on the landing page.
  • Landing Page Code: Allows enabling of special rules based on the needs of your project. Talk to GrowthPoint for more information.
  • Landing Page Offer: The Current Offer can be tracked in this page, if data is entered here it is viewable in the Lead Resource Center. We have the ability to track all offers, and pull a monthly report to show the results of these offers, if that is something you are interested in then an offer would not have to be entered in this field. To have this report created contact GrowthPoint.
  • Security: Leave setting as No.
  • Landing Page Referrers: Leave blank. Used for reporting.
  • Setting for Pass through Cookie: This is an option you might want to modify. When enable, it allows visitors to avoid re-entering their contact data in order to retrieve an additional offer. You can provide this feature for return visitors to only this page, the project, the campaign or your domain. You can time-limit this feature to the desired number of days. We recommend allowing a pass through cookie for only the page, with a Cookie Expiration of 30 or 60 days.
  • Preset Field Values: This option allows a field and field value to be entered on every lead submitted, without the visitor having to fill out the field. An example would be to enter the title of a document offered. To use this feature, click the plus sign on the bottom of the Preset Field Values window. In the Fields dropdown, start typing a field name to see all the available fields containing those characters. Click on the desired field, then enter the value (e.g. the document name) in the Value field. Click Save then click Update.

Landing Page Primer

A good landing page can help you:

  • promote an ebook
  • redeem marketing offers such as free trials, demos or even coupons for your product
  • sell a product
  • create a focused, interest-based email list to nurture into leads
  • drive traffic to your Facebook page (very social)
  • educate your prospects
  • promote awareness of your brand

Now that you understand the importance of a landing page, how do you make one that will work well? Following are some best practices for creating effective landing pages.

Campaign Specific

One of the biggest differences between great landing pages and okay pages is specificity. Your offer was intriguing enough to grab someone’s attention and earn their click, so why would you send them to a page or website that doesn’t continue to talk specifically about that offer? The best landing pages are designed to match the ad and the offer that will drive traffic to it. They are targeted, specific and contextually relevant.

Have a clear goals and strategy

What is the main goal of your landing page? Is it to create new prospects that you will nurture into leads over time? Or are you trying to generate qualified leads from the page?

If your goal is to create new contacts to nurture, asking only a few questions will give you a higher conversion rate. If your goal is qualified leads, you need to ask qualifying questions. Unfortunately, that will scare some people away. Ask only needed questions and be sure your offer is so compelling that the prospect will be willing to answer your questions.

Do NOT have distractions on the page. All content should help entice the prospect into converting. For example, do not have links to other sites on the registration page. You can add those to the “Thank You” page.

Have a strong, clear call to action

If you don’t ask for it, you probably won’t get it. When visitors arrive on your landing page, they want to first know that they are in the right place, and then they want to know what to do next. Use a strong call to action to direct their attention towards your offer. A good call to action is attention grabbing. It asks a visitor to take one clear action while also reinforcing what your visitor will get in return.

Clear value proposition

Don’t forget your pitch! The page your visitors land on is totally under your control, and it’s your chance to create an experience that convinces your prospects that they need your service or product. Make sure your landing page clearly defines what your business has to offer and then makes them want it now. A clear value proposition helps attract better lead quality because visitors are able to identify whether your product or offer is a good fit for them.

Strong headlines matter

Just as quickly as someone clicks to your page, they can click away. Although your ad may have initially captured a visitor’s attention, your landing page only has a few seconds to convince visitors that it’s worth their time to stay and  read a little more. Let visitors know what you have to offer and pull them in with strong, appealing headlines. Incorporate your offer and value proposition into both your headlines and subheads.

Constantly test every thing

When the page is first created, test how it displays on different browsers. Also test to make sure that, when the form is submitted, a lead is created with the correct fields. If you need help, contact your GrowthPoint contact to help.

Once the page is active, check conversion rates and how well you are meeting your goals. If your rates are low, evaluate why. Is your offer not compelling or is there some other issue?

Collect Webinar Content and Data

When planning your webinar your mind is on what should the topic be, who are the speakers, and what technology will work best. You also need to think about what questions you want to ask upon registration and at the conclusion of the webinar what you want to ask the attendees. Keep in mind that if you are going to ask if someone wants to be contacted by sales you need to gather the information needed so the leads can be assigned to the correct sales person. One thing that is often forgotten but is necessity is country. We need to know where each contact is from that so they can be emailed or assigning to a sales person

Outline the steps of what you want to happen after the webinar. Also make a list of the offers you want to provide the attendees and registrants from the event. Then write each of the letters to the prospects, including the offers and subject lines, next write the sales persons source description. You can use the sales template so the bulk of the sales email is written, then just the project description and notes for sales in the source description.

Following the event format the excel files so it is ready for import. If there are columns in the spreadsheet that you do not need imported remove them. The headers on your columns are what the field names on the leads will be coded as. It is best to be as consistent as possible between the files, use the same field names each time the file is sent and make sure the data in the file is consistent. Using a standardized list of field names and value will keep your database clean. An example of fields that should be standardized are Job Function and Industry. Additional detail about the process and instructions to help you ensure you have a process for collecting data and keeping the data clean and consistent is webinar program process. Please also make sure that the fields needed for assignment are included and the values match the system values. You can include the grade in the file if desired and it will override the grade in the project.