Lead Grading Guidelines

The key to successful demand generation programs is having consistent Sales follow-up of qualified leads. Sales needs to see consistent lead qualification criteria between Campaigns and tactics. It is critical that Marketing and Sales needs to have a common agreement on lead qualification definitions. GrowthPoint recommends a simple grading scheme for sales ready leads, based on 3 grades to communicate priority. There will be other lead grades that only marketing will use for non-sales ready leads. Example Prospects who have expressed some interest, but are not ready to a Sales person to contact.

The 3 sales ready lead grades are below.

Hot

Prospect has been through filters to remove (competitors, and other non influencing individuals), and indicated there is an active project they are working on, and would like to be contacted by an local expert.

It is important to realize there will be few of this graded leads, because many buyers would like to self serve vs vs talking to a sales person and be “sold”. Hot leads are urgent because the Prospect is waiting for someone to follow-up. The value in dollars of Hot leads are not necessarily and higher then other graded leads. Typically the Prospect is mush further down the buying process then other graded leads. Examples of a Hot leads are

  • Tradeshow booth worker met with prospect who indicated they would like to learn more about the products/solutions and have someone follow up with them.
  • Prospect downloaded a white paper off and indicated they would like to be contacted by a local expert
  • Prospect attended a marketing hosted webinar asked questions indicating they have an active project that are going to make decisions on suppliers soon.
  • Prospect has requested a quote for a product or service on the company website

Warm

Warm graded leads are where filtered prospects indicated they have needs that align with our products or services, authority based on position or Job Function, potentially a funded project or they are building the business case, but did not expressly say they wanted to be contacted. This does NOT mean these Prospect are not as important as a Hot leads, it means the Hot leads are more time sensitive because the Prospect is waiting for someone to follow up with them. Typically Warm leads are earlier in the buying process where it is easier to influence their preferences. Examples of Warm leads are:

  • Tradeshow attendee where a company booth worker qualified the Prospect with buying influence, interest in company offerings, potential funded project, but did not specifically request a follow up.
  • A webinar attendee who engaged the speaker with good questions and job function indicates they have influence in buying process
  • Prospect who engaged with nurture program indicating they have a funded projected and job function indicates they have influence in buying process.
  • Prospect requested a catalog, sample product, or demo and job function indicates they have influence in buying process.

FYI Only

This is a special grade lead for Sales they are told they do not have to follow up on these leads. The are just for their information. They may see a person in an account they are trying to crack, and this may be a good excuse to make contact with them.

FYI Only graded leads are to inform Sales there is a partially qualified Prospect who has responded to an Offer. Because these Prospects have not been fully qualified because of missing data, but have been through filters to remove non influencers or competitors.

Nurture

Nurture grade is when a Prospect has responded to a marketing offer like downloading a white paper, but are not qualified or Sales ready. The intent of Nurture grade leads is, to Nurture the Prospect over time building preference and trust. When the Prospect has been qualified with an opportunity, a Warm or Hot lead will be sent to Sales for follow up.

Create Transactional Prospect Email

Create message and identify offers

Before you start creating your email, think about what it is you want the recipient to know or what action you’d like them to take. Create a message that will grab your prospect’s attention. Point out their pains and describe how you can solve them. Include the results your solution has produced or provide an offer that will help explain how you can solve their problem. Do not make the mistake of just telling the prospect what you do or offer. Take their perspective. Tell them what is in it for them. Consider that you are taking up their valuable time to read your email. The goal is to quickly and simply encourage your prospect to want to know more.

Enter email delivery information

In your project set up when you add a new blank prospect email the Email Summary will be mostly blank. If you need instructions on adding a transactional email to a project check the section Setting up a Basic Project. Once your project is set up to receive a prospect email you will see a blue envelope in your project drop down in the Campaign tab on the left side of your screen.  Email_Summary_ScreenV2

    1. In the Campaign list on the left of the screen, find and click on the template you created. Prospect emails are indicated by a blue envelope.  If you don’t see your email, click the plus sign next to the Campaign and/or Project to expand the list. When you click on the email icon, the Email Summary tab will open on the right side of the screen.
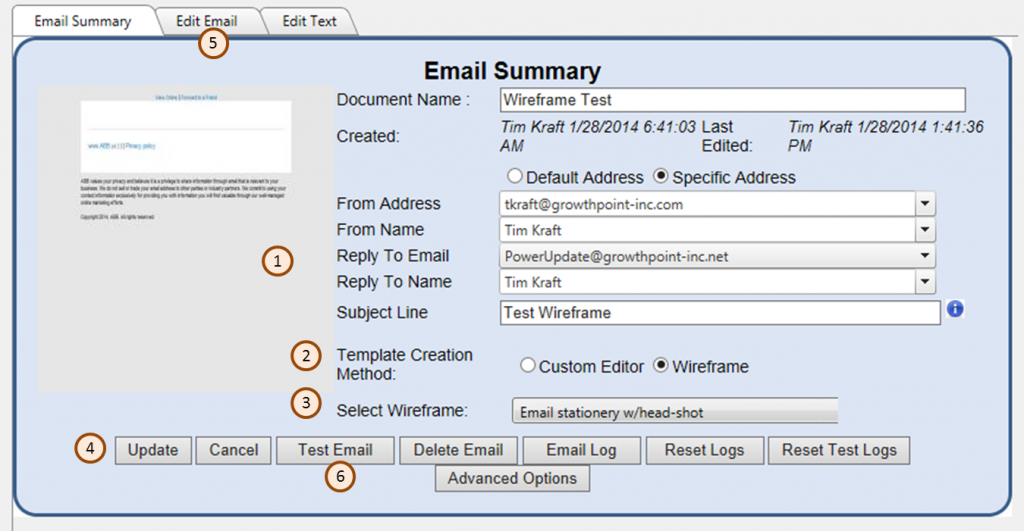
    2. On the Email Summary tab, the (1) From Address will be the Default Address Click the Specific Address radio button to select an address from the drop down. From the dropdown menus along the right, select the data for each field. In fields that say “Type in search terms,” you can type a few letters of the desired field contents to see a list of matching results. Ensure that the Reply to Email is a valid email if you change from the default email address.
    3. Enter a Subject Line for your message that is both descriptive and attention-getting.
    4. For the Template Creation Method, (2) click the Wireframe radio button. In the Select Wireframe dropdown menu, (3) choose the wireframe design/layout you want to use.  You will find a template for Prospect Emails. This is a good option for a simple prospect email. You will see a popup message saying “Changing of wireframe may lead to removal of all statistics and data of the existing template.” It warns you that, if you started a template and then changed wireframes, it erases the content already entered. (4) Click Update to save your changes.You now have blank wireframe, ready to populate with your content.


Enter Email Content

In this step, you will use the new wireframe you selected and named, and fill it with the text, pictures, and other information to create your email. Before beginning this step, it is a best practice to have the text written and any images collected and ready to upload.

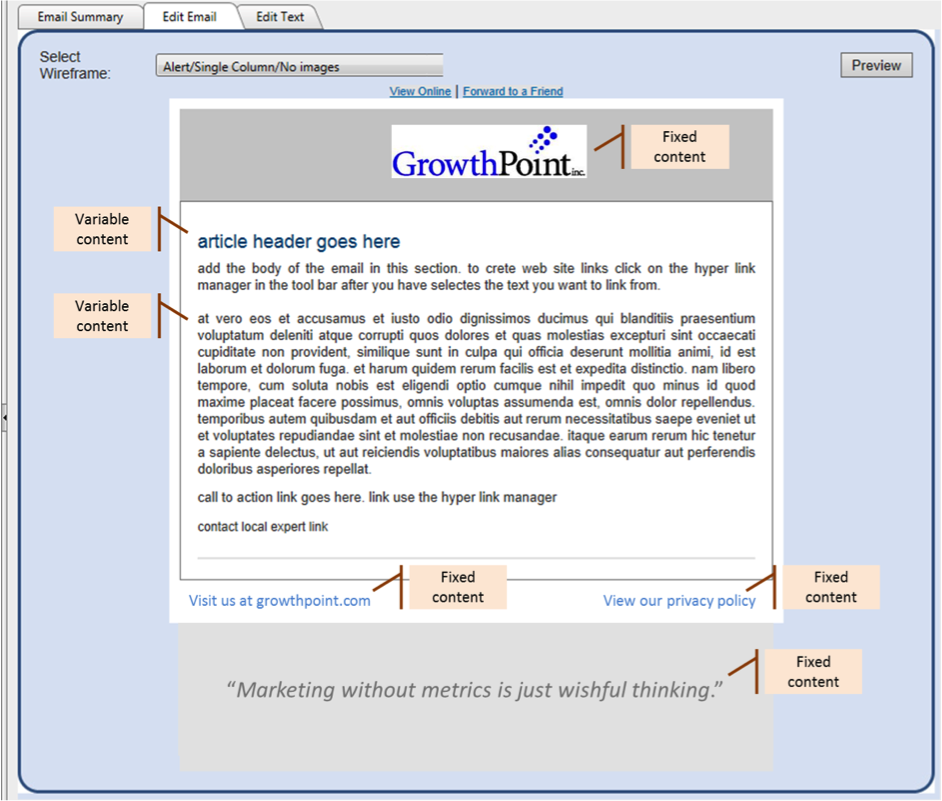
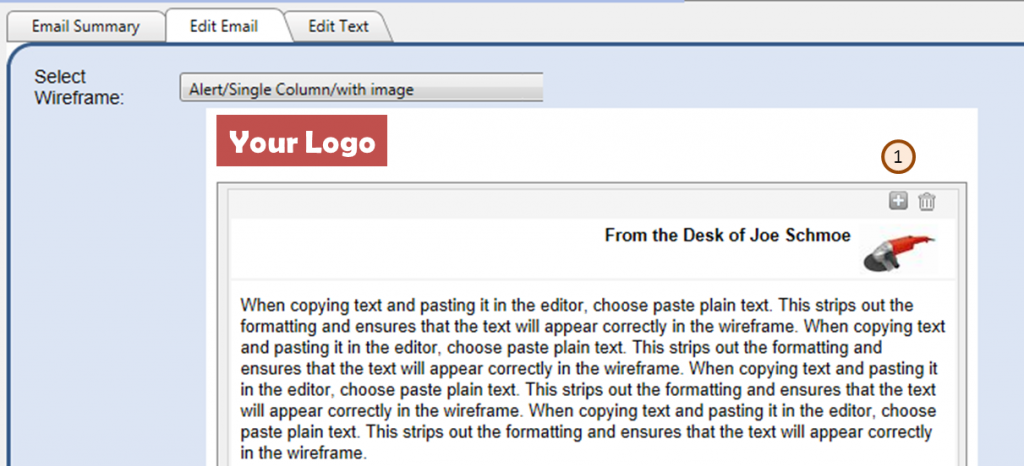
    1. Click the (5) Edit Email tab at the top of your screen next to the Email Summary tab. You will see a blank wireframe template, ready for your content. It will show placeholders for your dynamic or variable content (text, images, links etc.). Places where you can enter text are indicated by placeholder text. Places where you can enter images are indicated by a grey box with the dimensions of the available area in pixels.
      The image also shows the fixed content that is common to all emails based on this wireframe.  You cannot change that content by editing the email. You would have to go back and create a new wireframe or edit an existing wireframe to change this content.
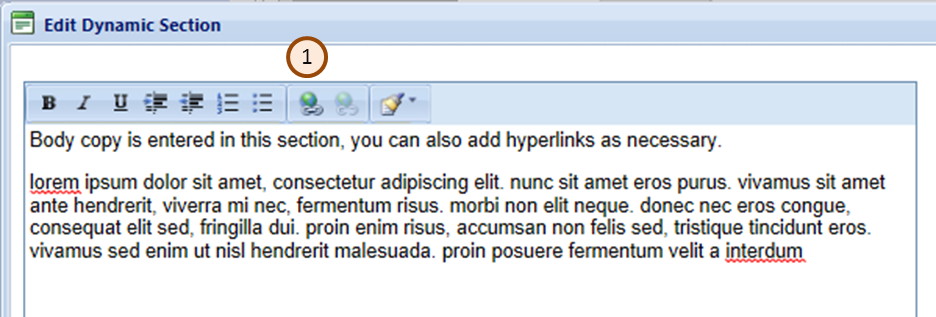
    2. To add text, click on any block of text in the wireframe. This opens the Edit Dynamic Section window with a text editing window where you can add or edit text. You have the common text editing tools available in the toolbar. When copying/pasting text, it will retain the formatting from the source document. In most cases, it is better to click the Strip button in the toolbar to remove all formatting. Another method is, when pasting your text, to right-click and choose Paste Plain Text. Once entered, you can format text with the basic tools, such as bold, italics, underlining and bullet points.
    3. Also in the toolbar you have the ability to include hyperlinks in the text. Details on entering a hyperlink can be found below.
    4. You can add system fields that automatically fill in with information from the database that is unique to that prospect. For example, if you insert the field ::Name:: your email could include the name of the prospect. Another field you might want to include is the sales person’s name and contact information.
    5. After entering or editing text, click Save to return to the wireframe template. Note that if you do not update or remove the default text, it will appear in your wireframe.
    6. When you are done making edits, click Update at the bottom of the page to save your changes. If you forget to save you will get reminder message to save before you leave the screen.

Add a hyperlink to your text

Adding hyperlinks allows you direct recipients to landing pages, documents in LeadCentral and other online resources. You can include multiple hyperlinks in the text of your template, enabling the recipient to quickly access the resources. You can also attach links to images.

To enter a hyperlink, from the Edit Email tab, highlight the block of text where you want to add the hyperlink. Click the (1) Hyperlink button.Edit_Dynamic_Section

After you click on the Hyperlink button, the Hyperlink Manager window will open.

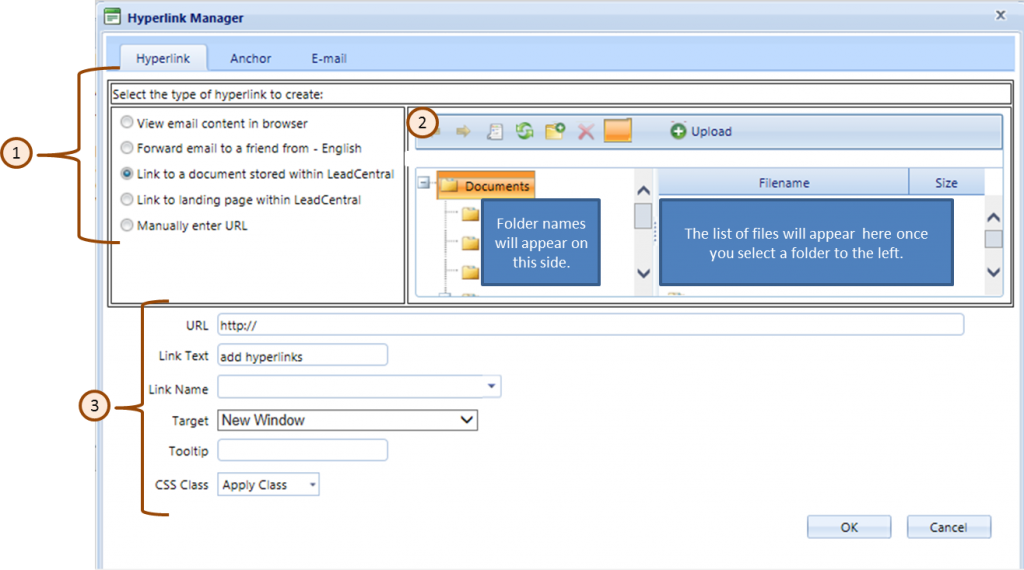
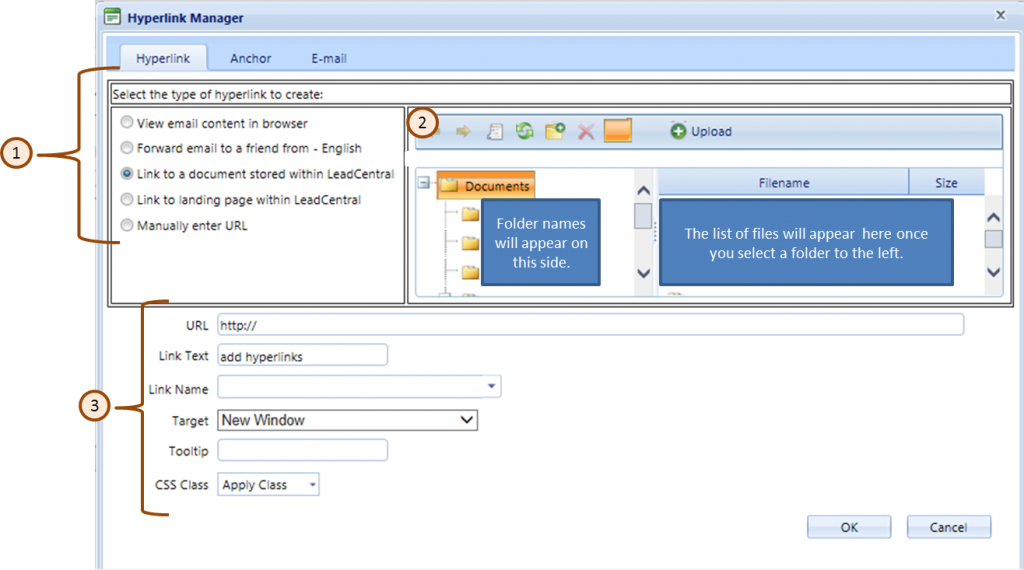
hyperlink_ManagerViewYou have several options for the type of hyperlink (option 1 above). In this instance, you will most likely want to link to a document, a landing page or manually enter a URL. These options are explained below.

  • Link to document stored within LeadCentral: Creates a link to documents stored within LeadCentral. The advantage of linking to documents stored in LeadCentral is that they system can track these downloads to identify how frequently an asset is downloaded and by who. You can also link to a document stored outside LeadCentral by using the “Manually enter URL” option (below), but data about that download will not be tracked. After selecting this option, you will need to (2) navigate to the document stored in LeadCentral.
  • Link to landing page within LeadCentral: This option creates a link to an existing landing page within LeadCentral. The advantage of linking to landing pages within LeadCentral is that the system can collect additional information about the recipient, including the creation of a new lead. You can navigate to the landing page three ways:

      1. Select Landing Page by Campaign/Project: Shows all the available landing pages organized by campaign/project
      2. Select Landing Page by Custom Process: Show only the landing pages used in custom processes, organized by custom process.
      3. Select Landing Page by Domain: Show all of the domains, and all of the landing pages within each domain.

After clicking the radio button to indicate the location of the landing page, click in the (2) Landing Page dropdown and choose the desired landing page. You have two (3) contact data handling options, Update Data on existing lead and Copy Data to new lead. Most likely you will want to update the data on the existing lead. The details of the two options are below.

      1. Update Data on existing Lead: Specialized applications may require this option. Before selecting this option, contact GrowthPoint.
      2. Copy Data to new lead: Always select this option. When the recipient clicks on a landing page, the system automatically creates a new lead and populates it with all known information from the contact record. This avoids the need for the recipient to re-enter data and improves the conversion rate tremendously.
      3. Manually enter URL: Creates a link to pages or assets outside of LeadCentral. Clicks and downloads related to these links are not tracked by LeadCentral. When possible, upload the document to LeadCentral and use the “Link to document stored within LeadCentral” option.
Format Hyperlink options

In the Hyperlink Manager at the bottom of the Hyperlink Manager screen, section 3 on the Hyperlink graphic, you will see a number of optional fields for completion:

      1. URL: If you selected a document or landing page in LeadCentral, the URL will automatically fill in. Otherwise, you will have to manually fill in the URL.
      2. Link Text: This field simply repeats the text that you selected to be highlighted as your link. You can edit the link text here and that change will also be made within the email.
      3. Link Name: Enter a descriptive name of what the link connected to. This will greatly simplify review of reports related to the email because the number of clicks on each link will be reported by the link name you enter. This provides at-a-glance analysis of the most-clicked links. This field is only for reporting and will not appear in the email. Note that if you select “View email in browser” or “Forward email to a friend” you cannot add a link name.
      4. Target: Defaults to “New Window” which is the preferred option.
      5. Tooltip: Text entered in this field will appear as a pop-up when the recipient hovers over the link.
      6. CSS Class: Defaults to “Apply Class” which is the preferred option.

After creating and formatting your hyperlink, click OK to save the changes.Email_Hyperline_Manager

Create E-mail Hyperlink

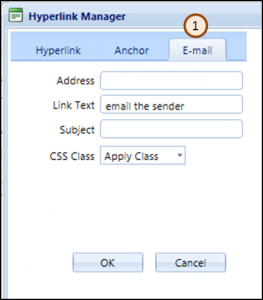
This option creates a link that will open a preaddressed email. From the Hyperlink Manager, click the (1) E-mail tab. In the Address field, enter the destination email address. The Link Text field shows the text you highlighted in the email as the link. Fill in the Subject of the email. Leave the CSS Class dropdown with the default selection, “Apply Class.”

Test email and links

Before sending out your email, you’ll definitely want to do some testing. You don’t want to make any embarrassing mistakes in front of your recipients. Some general testing tips include: Proof your content, Test all the links, Confirm the address information, and Review the subject line for accuracy. The benefit of using a wireframe is you will not need to test the message in a variety of email engines as the templates have been tested previously.

Sending a test message

  1. On the Email Summary tab click the (6) Test Email button. In the pop-up window, the radio button Select mail Source should be set to Sample. In the To:  field, enter the destination email address, typically your address for initial testing.  Review the email, make adjustments or corrections as necessary, and send the test email. Continue to send individual test emails to yourself or others until you are satisfied that it is correct, properly formatted, and ready for further testing.  When you are done click Exit.
  2. Another option for testing is to override all the emails for a project. This option would be used when you want to fill out a landing page and test what emails are generated and what they look like. The process will grade the leads as Normal and send all the emails that are set up in the Project to the email address that was entered on override.
    To place a project on override, check the box in Customer Communications section of the project labeled Redirect all Project email, and enter an email address. When you are done click Update at the bottom of the project page.To get to this location, open the project by clicking on the project name on the left side of your screen, the Project Summary tab will open on the right side of your screen.  When you are done, click Update at the bottom of the project page. Customer_CommunicationsRemember to remove the :Redirect all Project Email” email address,  uncheck the box and click Update on the bottom of the page when you are finished testing to remove the project from override. If you don’t the leads will be entered, graded and assigned correctly but all emails will be sent to the email address indicated in the redirect all project email box.


Testing the Automation Process

Now that your process is set up, the prospect email content is entered and the sale email is in place it is time to start testing. Before you start make sure your Process is set up in test mode.

Set the Process to Test Mode

  1. Open the Process and take a look at the Process Summary tab (1) on the right side of the screen
  2. The Run in Test Mode box (2) should be checked
  3. Test Mode Time Duration set (3) – recommendation of a 5 minute delay
  4. Change the Process to Active (4) (check the Yes Radio button)
  5. The Process Run Schedule (5) should be set to Manual Execution Only
  6. Set the Redirect all process emails to yes (6) and enter your email address (either a company or personal email address will work)
  7. The Source of the Records (7) (Leads from Project) will already be set to your project
  8. Add the ::Name:: token to the subject line of all the processes emails. This will have to be removed before you go live but it will make testing easier

Test file details

  1. There is a sample file in your Tool Menu, named Sample Webinar Automation Project Test File. It would be helpful to download this first before your next step.
  2. In the test files the columns in blue are the fields that will be imported, the yellow columns in your sample file track if the emails are received, the green columns track how to respond to each email. By mapping out your test plan ahead of time you ensure that you can test each step of the process.
  3. The email addresses in your test file do not have to be valid.  This is because all emails will be sent to the redirect email address you have in place (step 6 above)
  4. Edit the file so the name in the file to matches the email address. For example [email protected] for the email address would match the name of mytestname1. This allows you to test each path of the process and keep track on what email you are processed
  5. Include a column for “Attended Webinar” in your sample file, indicate Yes on 1/2 the records.
  6. In the file for your tracking purposes add columns to track if each email is received, for example “Thanks for attending” email, “Thanks for viewing on demand webinar” email, and did not attend email. Change those columns depending on what emails you are sending to the prospect.
  7. Include a column for each of the decision points in your process, for example was view recording clicked, was the whitepaper offer click, was the landing page for an offer submitted, etc.
  8. Include a column to verify the sales email was received when it should have been. For example when Hot lead is generated (when someone asks to talk to a sales person) an email should be sent. You can follow the steps in your automation process, this is a typical configuration.
  9. If the column header and value is one used in the process make sure the test file and final vendor file contain clean data. For example if the field “Attended Webinar” with a value of Yes causes specific action in the process, then the data in the import file must be clean for the right action to be taken. In this example the header doesn’t say “Went to Webinar” versus “Attended Webinar” or the values are Y vs. Yes.
  10. Send a test file to [email protected] and indicate what project the file needs to be entered. The project name (8) will be the one listed on your Process summary tab.

What should I look at in my process to confirm it is working?

  1. Check all the emails, prospect and sales for content and confirm the subject lines are correct and the offer links point function and point to the correct location
  2. If there is a “Contact Me” landing page does it prepopulate with the prospects information
  3. Click manually start the process to start testing the process. If there is another process running the test will not start. You can tell when the process is running based on the Last Run Time field.
  4. Was the first email received, if the first email was not opened was the second copy of the email received. This is assuming there is a second drop to non-openers is set up
  5. If the offer link is clicked does the next step move correctly tot he next step
  6. If a landing page is filled out so that a sales lead should be created is the sale email received? Does that lead have the correct grade, correct source description and correct assignment. On the lead detail sheet is all the key fields that you entered on the lead correct and present on the lead
  7. If a sales email is not sent confirm there should not have been one sent. For example if the lead is graded as Cold, Nurture or FYI no sales email would have been sent.

When you are done testing, what are the next steps?

  1. If there were leads not processed as expect discuss this with your GrowthPoint project manager.
  2. Request the test leads are deleted by your GrowthPoint project manager. It is helpful to know the project name and the email addresses you used in the test file
  3. Remove the ::Name:: taken from the email subject line of all emails
  4. Open the process and click on the Edit Process tab, click the Reset Count Button, you will get a pop-up message to confirm this is what you want to do. Click OK. then the Save button. A confirmation screen will appear, click OK. The screen will change back to the Process Summary page
  5. Click on Automation button at the top of the screen.
  6. You do not need to resent the counts on any landing pages, prospect or sales emails, by resetting the counts all are reset to zero.
  7. On the Process Summary page remove the check box that has the process on test mode (2)
  8. Change the redirect all process emails (6) radio button to No. The redirect email address you have entered will disappear
  9. Change the process to active (4).
  10. Set the Process Run schedule drop down (5) to daily. You can choose more often, but once a day for import files should be frequent enough.
  11. If you so choose you can request that only a portion of your file is imported so you can watch the details on the first few records pass through the process.
  12. Send the lead file to [email protected] include the project name and make sure the column names and values are correct before you do so
  13. After the file is imported and your process starts you will see leads moving along the process.
  14. In the event that you have someone that wants to be removed from the process after they enter it they will need to be suppressed from future emails.

Add New Blank Email Template

In this process, you will select a wireframe (template) to create an email for distribution to a target list of recipients. Each wireframe includes certain blocks of content (text) and images (photos) arranged in a layout. In a separate step, you will later fill in this wireframe with your specific content and images.

Wireframe Vs. Template

A wireframe is the preformatted skeleton for an electronic document such as an email or newsletter. The wireframe may include some static content, text and images, that will be included in all documents based on the wireframe. The wireframe includes preformatted placeholders where you will insert your custom content. The wireframe is designed to meet your brand guidelines, including appropriate formatting and use of logos.

A template is an electronic document, based on a wireframe, that has been customized with your content for a specific audience or application. Because it was based on a wireframe, all templates will have a consistent, professional appearance.

Choose Your Template

Review Available Wireframes: Before creating a new template, review the available wireframes from the Marketing Resource Center Tools menu View Wireframe Samples. You need to know the name of the wireframe design you plan to use before proceeding with the next step.

Template_Using_Wireframe

Add a New Email Template

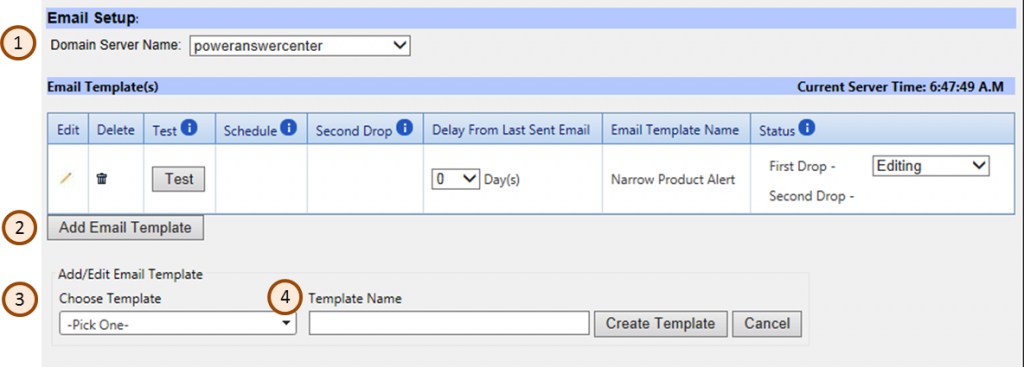
From the Campaign Management tab, in the Campaign list to the left of the screen, find and open your project. In the Email Setup / Email Template(s) section of the screen, select the correct (1) Domain Name Server. There may be only available. If there are more and you are unsure of the correct server, contact GrowthPoint. Click (2) Add Email Template. From the Add/Edit Email Template area, click (3) the dropdown menu for Pick One and choose Add New Prospect Template. Enter the name of your email template in the (4) Template Name field. Use a name that includes its purpose and the layout name of the wireframe (Example: New product announcement – Email Stationery w/Head Shot). Click Create Template. At the bottom of screen, click Update to add the new template.


In the Campaign list to the left of the screen, find and click on the template you created.

Email_Summary_ScreenV2


Enter the delivery information

On the Email Summary tab, click the Specific Address radio button. In the (1) appropriate fields, enter the information for:

  • From Address
  • From Name
  • Reply To Email
  • Reply To Name – The only available options will be shown in this drop down
  • Subject Line

All the address fields you will have a drop down of available options which you can add additional lines, except for the reply to address which an item needs to be choose from the drop down.

For the Template Creation Method, (2) click the wireframe radio button. In the Select Wireframe dropdown menu, (3) choose the wireframe design/layout you want to use. You will see a popup message saying “Changing of wireframe may lead to removal of all statistics and data of the existing template.” It warns you that, if you started a template and then changed wireframes, it erases the content already entered. (4) Click Update to save your changes.

You now have blank wireframe, ready to populate with your content.


Using an Email Wireframe

In this step, you will use a new wireframe that you selected and named, and fill it in with the text, pictures, and other information to create your email.

From the Marketing Resource Center, use the left navigation pane to find and open the desired email template. The blue envelope under your project will signify the prospect email. Click the Edit Email tab to view the blank wireframe template, ready to add your content.Wireframe


Wireframe Tour

  • The template will show placeholders for your dynamic or variable content (text, images, links etc.).
  • Places where you can enter text are indicated by placeholder text.
  • Places where you can enter images are indicated by a grey box with the dimensions of the available area in pixels.
  • The image also shows the fixed content that is common to all emails based on this wireframe.

If a wireframe is updated you have the ability to use that wireframe on your template, details can be found here.

You cannot change that design of a wireframe. Contact GrowthPoint to discuss if there is not an existing wireframe to meet your needs. If you want to recheck the available wireframes, the available wireframes can be previewed from the Marketing Resource Center Tools menu option entitled View Wireframe Samples.

Adding Text to Wireframe

From the Open your project and click on the prospect email envelope. From the Edit Email tab, click on any block of text in the wireframe. This opens the Edit Dynamic Section window with a text editing window where you can add or edit text. You have the common text editing tools available in the toolbar. When copying/pasting text, the formatting is stripped however to be save when pasting your text you can right click and choose Paste Plain Text. Also in the toolbar you have the ability to include hyperlinks in the text. After entering or editing text, click Save to return to the Edit Email tab. Note that if you do not update or remove the default text, it will appear in your wireframe.

Adding Hyperlinks

Adding hyperlinks allows you direct recipients to landing pages, documents in LeadCentral and other online resources. You can include multiple hyperlinks in the text of your template, enabling the recipient to quickly access the resources. You can also attach links to images. To enter a hyperlink, from the Edit Email tab, highlight the block of text where you want to add the hyperlink. Click the (1) Hyperlink button.Edit_Dynamic_Section

After you click on the Hyperlink icon the Hyperlink Manager window will open.

hyperlink_ManagerView


You have several options for the type of hyperlink (option 1 above):

  • View email content in a browser: Creates a link allowing the recipient to view the email in a browser instead of as an email. This is sometimes helpful because different email clients will display your email differently. Viewing the email in a browser ensures that it displays as you intended.
  • Forward email to a friend – English: Opens a pop-up window allowing the recipient to forward the email to someone else who might be interested in the content. This link is typically included near the top of the email. It’s helpful to provide this ability to forward the email in a way that enables the system to capture the forwarded address and add it to the contact database. Without this link, the recipient could simply forward the email using the standard email Forward feature, but the system won’t be able to capture the forwarded recipients contact information. Note that the pop-up window will open in English.
  • Link to document stored within LeadCentral: Creates a link to documents stored within LeadCentral. The advantage of linking to documents stored in LeadCentral is that it can then track these downloads to identify how frequently an asset is downloaded and by who. You can also link to a document stored outside LeadCentral by using the “Manually enter URL” option (below), but data about that download will not be tracked.

After selecting this option, you will need to (2) navigate to the document stored in LeadCentral.

Link to landing page within LeadCentral

Creates a link to an existing landing page within LeadCentral. The advantage of linking to landing pages within LeadCentral is that the system can collect additional information about the recipient, including the creation of a new lead. You can navigate to the landing page (1) three ways:

  • Select Landing Page by Campaign/Project: Shows all the available landing pages organized by campaign/project.
  • Select Landing Page by Custom Process: Show only the landing pages used in custom processes, organized by custom process.
  • Select Landing Page by Domain: Show all of the domains, and all of the landing pages within each domain.
  • After clicking the radio button to indicate the location of the landing page, click in the (2) Landing Page dropdown and choose the desired landing page. You have two (3) contact data handling options:
    • Update Data on existing Lead: Specialized applications may require this option. Before selecting this option, contact GrowthPoint.
    • Copy Date to new lead: Always select this option. When the recipient clicks on a landing page, the system automatically creates a new lead and populates it with all known information from the contact record. This avoids the need for the recipient to re-enter data and improves the conversion rate tremendously.
    • Manually enter URL: Creates a link to pages or assets outside of LeadCentral. Clicks and downloads related to these links are not tracked by LeadCentral. When possible, upload the document to LeadCentral and use the “Link to document stored within LeadCentral” option.

 “For more information” Hyperlink

There are times when you want to use one page for a variety of purposes so that multiple pages don’t need to be created. You can modify a hyperlink to automatically track requests for information from that link. To create this type of link, first follow the instructions to create a “Link to a Landing Page Within Lead Central.” The URL for the selected landing page will automatically appear in the URL field. At the end of the URL, add the field name in the LeadCentral database that want to be filled in, and the data that you want to be added to that field.  Example: If the URL was: http://opp2.lead-central.com/::LeadGUID::

You would add “/customerinterest=xyz” where “xyz” is the text you want captured in LeadCentral’s customerinterest field. If you wanted to add the text “CostReduction” to the customerinterest field, the resulting URL in the URL field would be: http://opp2.lead-central.com/::LeadGUID::/customerinterest=CostReduction

The customerinterest field is the most commonly used field to capture this type of data, If want to capture and store data to other fields, contact GrowthPoint.

Format detail on the Hyperlink

In the Hyperlink Manager at the bottom of the Hyperlink Manager screen, section 3 on the Hyperlink graphic, you will see a number of optional fields for completion:

    • URL: If you selected a document or landing page in LeadCentral, the URL will automatically fill in. Otherwise, you will have to manually fill in the URL.
    • Link Text: This field simply repeats the text that you selected to be highlighted as your link. You can edit the link text here and that change will also be made within the email.
    • Link Name: Enter a descriptive name of what the link connected to. This will greatly simplify review of reports related to the email because the number of clicks on each link will be reported by the link name you enter. This provides at-a-glance analysis of the most-clicked links. This field is only for reporting and will not appear in the email. Note that if you select “View email in browser” or “Forward email to a friend” you cannot add a link name.
    • Target: Defaults to “New Window” which is the preferred option.
    • Tooltip: Text entered in this field will appear as a pop-up when the recipient hovers over the link.
    • CSS Class: Defaults to “Apply Class” which is the preferred option.

After creating and formatting your hyperlink, click OK to save the changes.Email_Hyperline_Manager

Create E-mail Hyperlink

This option creates a link that will open a preaddressed email. From the Hyperlink Manager, click the (1) E-mail tab. In the Address field, enter the destination email address. The Link Text field shows the text you highlighted in the email as the link. Fill in the Subject of the email. Leave the CSS Class dropdown with the default selection, “Apply Class.”


Repeating a Wireframe Section

Repeating_a_section

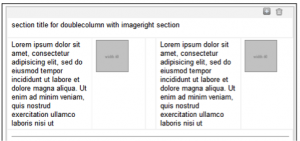
You can repeat the elements of your wireframe by hovering your mouse over the wireframe in the Edit Email window, then clicking the (1) Plus Sign at the top-right of the window. This duplicates all of the elements of the wireframe. You can now edit each of the text blocks individually. You can also replace the repeated images. Remember that if doing put a image in the placeholder that will leave a blank area in your wireframe. Cl2 colum add textick the Trash Can at the top of the window to delete the repeated section.

If the content is two columns wide, like the example to the right you do not need to fill out both sections.  The section you don’t complete will show up blank. For example you can enter the article on the left and leave the right article blank.

Moving Sections in a Template

After repeating a section and entering content and saving changes, you may find that the contents needs to be reordered. To move the sections hover over the section to be moved, and click on the grey border surrounding the article and drag the section to the new location. You will get a message that asks if you are sure you want to move, click OK to confirm the move. Sections can only be moved within their repeater section.

Preview the Template

At any time you can click the Preview button on the top right corner of your page. The view may not be perfect depending on your browser settings, but you can get a general idea of the layout and look. To see exactly how the email will appear it is recommended that you email a test message to your email account.

Adding Image to Wireframe

Image_uploader

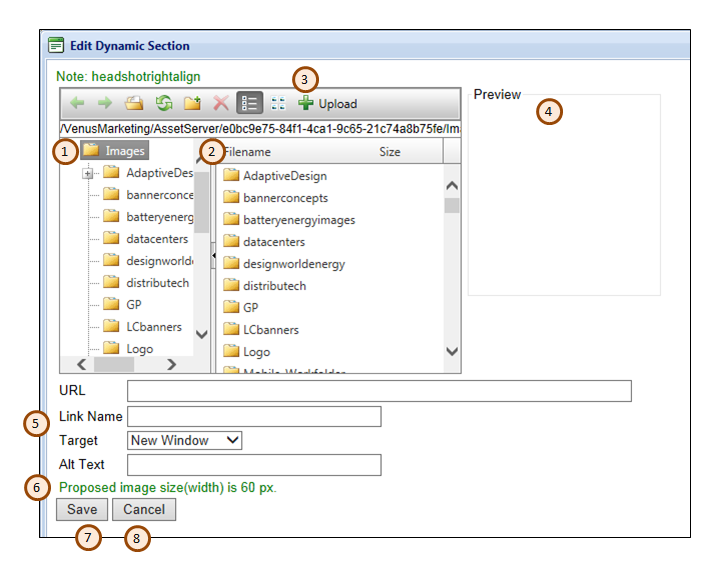
To add an image click on a grey images placeholder in the wireframe. This opens the Edit Dynamic Section window (shown to right) where you can select an existing image or upload a new image. Image placeholders have a suggested image size displayed in the wireframe. You will also see the image size indicated in the window when you click the grey image placeholder to add your images. Images uploaded will be resized automatically. If you do not want to the system to resize your image or like how it is done, you can resize the image on your own and upload the new image. This is discussed below.

Choosing an Existing Graphic

From the Edit Dynamic Section window, use the (1 & 2) folder navigation panes to find the desired graphic. Note along the top of the window that you can click icons to Refresh the screen, create a New Folder, and switch views between a list view and thumbnail view. As you click on files in the list on the left, you can see the image in the (4) Preview Window.

Click the (7) Save button to add the selected graphic to the template, close the Edit Dynamic Section window, and return to your wireframe. If you make a mistake while in the Edit Dynamic Section and don’t want to keep the graphic you selected, you can select a different image to replace it, or click the (6) Cancel button to close the Edit Dynamic Section window without saving your changes. After you return to the Edit Email screen, you can also click on the image there to select a different image.

Uploading a New Image

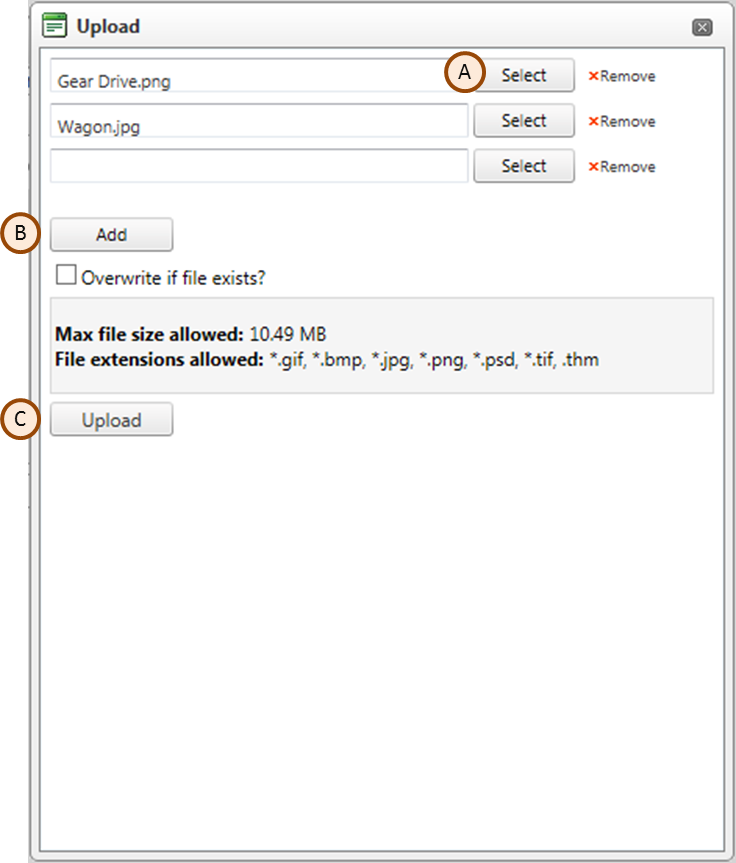
If you need to upload an image, click the (3) Upload icon at the top of the Edit Dynamic Section window. In the Upload window that appears (shown at right), click the (A) Select button. Navigate to the computer and location where the image is located. If you need to add more than three images, click the (B) ADD button. After selecting the images, click (C) Upload to add the images to the list of available files. You can now use the instructions above to add your new image(s) to the wireframe.

Attaching Links to Images
Uploading_an_image

Upload Image Window

You can make images “clickable,” providing links from them to other resources or websites. Navigate to the target resource and copy the URL. Select the image you want to add the link to which will open the Edit Dynamic Section window. Click in the URL field and paste in the URL. In the Link Name field, provide a descriptive name for the link for reporting purposes. In the Target dropdown, the system defaults to New Window (the linked item opens in a new window), which is the recommended option.

Finally, in the Alt Text field, enter some descriptive text for the image. This text will appear instead of the image for users who view emails as text-only or who have image downloads disabled in their browser. Click (7) Save.

Resize an Image

If you select an image that is too large or too small for the placeholder in the wireframe, the system will proportionally stretch or squeeze the image to fit the placeholder dimensions. The results should be satisfactory however if you do not like the results you can resize your image. If your image is too big for the placeholder, you can use an image editor to resize it. Using Windows Explorer, navigate to the file and right-click it. Look at the “Open with” options available to see if you have an editor, such as Microsoft Office 2010, to open and resize it. If not, you will assistance from someone with editing software. Be careful enlarging your image to ensure the quality is still acceptable.

 Need to replace an image

If you want to make changes to the image you uploaded you can make changes to the file offline and re-upload the image. To replace the image you previously uploaded, (A) select the image, keeping the same file name, Check the Overwrite if file exists box which is found under the Add button and click (C) Upload to add your new image. Keep in mind that when you preview your newsletter might see the previous image. If this is the case after you have uploaded a new image clear your computer cache.

No Image for a Placeholder in a Wireframe

If you do not add an image where there is a placeholder, there will simply be a blank area there in your email.


Select Email Distribution List(s)

Find your project on the left side of the screen, click on the Project Name which will open the Project Summary tab on the right side of your screen.

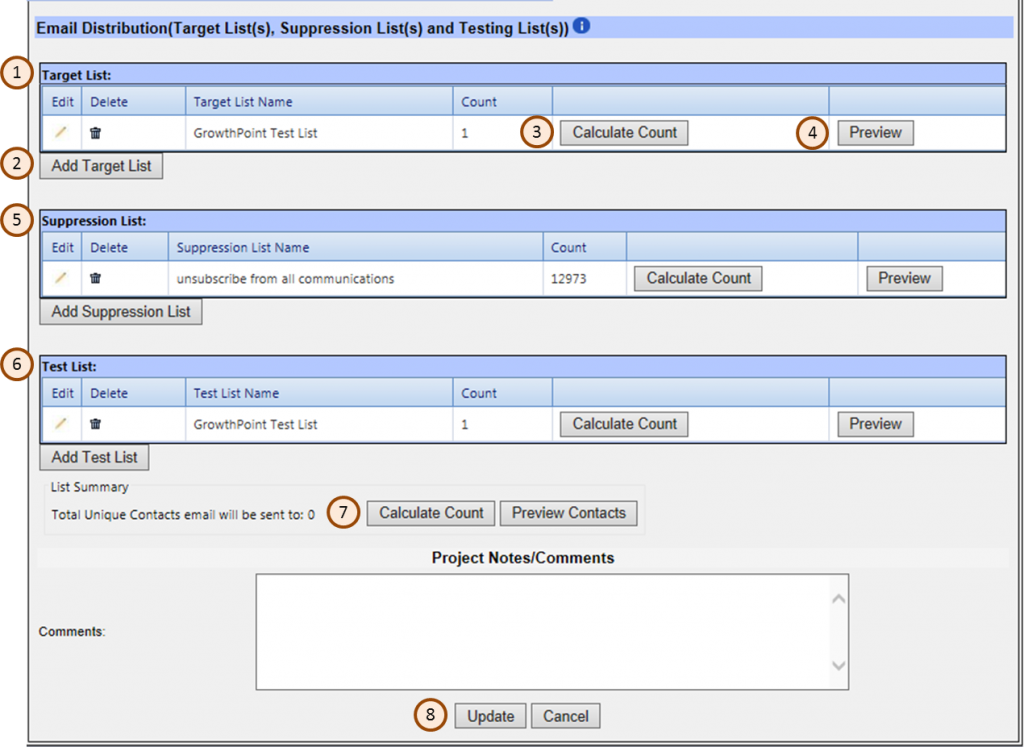
Three list types must be associated with a mailing:

  • (1) Target List of people you want to receive the mailing
  • (5) Suppression List of people who specifically should not get the mailing
  • (6) Test list of people who will receive the mailing to verify that it is correct prior to the actual distribution

For each of the three types of lists, there is an (2) Add Target List button that lets you include a list. You can include multiple lists Target, Suppression and Test lists. If you make changes to your lists, click (8) Update at the bottom of the screen to save your changes.  After adding a list, you can see how may recipients are in each list by clicking (3) Calculate Count. The lists are updated dynamically, click the button if it has been some time since you have added the list and want to recheck the count. Click the (7) Calculate Count button on the lower portion of the page to get a unique number of recipients after the emails on the Target list have the contacts from the suppression list removed. To see who is in a list, click the (4) Preview button to open the List Preview window.

If you have more Target list on your project you will see an image of an error pointing down or up. You will see the arrows to the right of the preview button. To change the order that your lists are sent to you just click one of up or down arrow buttons next to the list name. This is particularly useful if you want a specific group of people to received your email/newsletter first.targetlist arrows

View_of_Lists_in_Project


Previewing a List

List_PreviewIf you open a list to preview what contacts are in the list a List Preview opens. You can modify the columns shown in the List Preview by clicking (A) the Add/Remove Columns button. Click the (B) Excel button to export the list to a worksheet. If there are certain people who you would expect to be in the list, or not be in the list, you can quickly verify their presence in the list with the (C) Search field. Enter the search information and then, in the (D) Select One dropdown, choose the column (field) to search.


Do a thorough job of reviewing the results from your list to ensure you have included all the desired recipients and no undesired recipients. If the list is not returning the desired results, adjust your criteria and repeat the preview and verification process.


Email Results Reporting

From the moment your email is sent you can start tracking the results in real time in the MRC.  There are two levels of reporting available: results by individual email template, and results by project.  The results by individual email template will allow you to take a close look at the metrics for a specific template, including the click data for each link.  You can see the overall results for that specific template, and you can also see results grouped by drop date and target list.  The results by project allows you to see the results of each email template within that project side by side.

Results by Individual Email Template

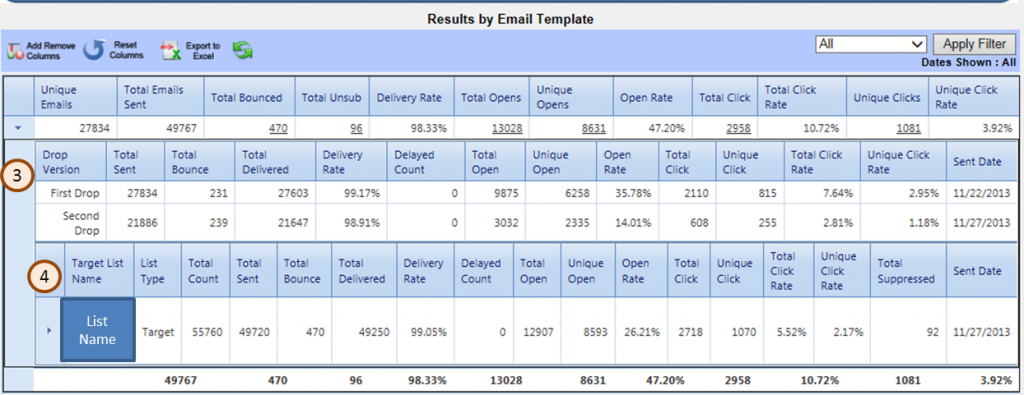
Look on the Email Summary Page to see results for a specific email template.  Here, you will find the overall metrics for this template.  You can customize this report by (1) adding or removing columns, and you can also (2) Export the results to Excel.  To get more detail, click on the carrot to the left of the row.

Results by email template

After you have expanded the details, you can see the (3) results grouped by individual drop and target list. If you have more than one Target list the results will be broken down by list in the (4) Results by Target List section.

ResultsByList

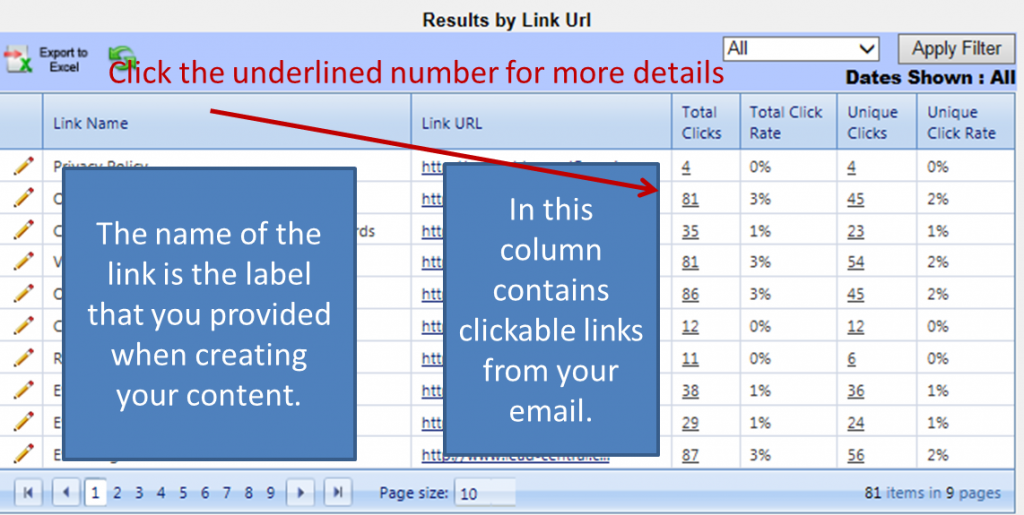
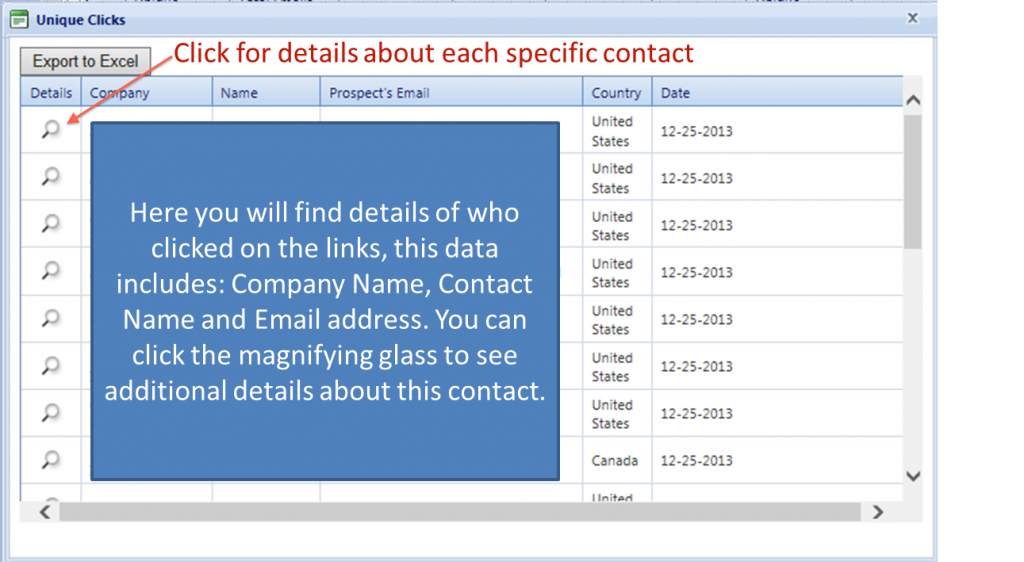
Scrolling further down the Email Summary Page you will find Results by Link URL.  This contains click data of all the links within the email template.  If you click on the underlined numbers in the Total and Unique Clicks column you will get names and details about the people who clicked on that particular link. Further details about each individual contact are available if you click on the magnifying glass to the left of the contact.  The entire history of each contact is tracked in LeadCentral.  So, on the Contact Detail Page you can see which emails a specific contact has received and opened, what they clicked on, and what tactics they have responded to across all Campaigns in LeadCentral.

ResultsbyLinkURL

UniqueClicks1

Results by Project

From the Project Detail Page, click on the Project Reporting tab.

Project Reporting tab

Here, you will find results for all of the email templates associated with the project.  Totals for the project appear on the bottom line.  Just like the Results by Email Template, you can customize this report by adding and removing columns and you can also export the data to Excel.  Use this report to compare email templates, or track the results of a newsletter over time.

Project reporting tab


Setup Landing Page Project

Open the Marketing Resource Center (MRC) to see a listing of Campaigns. Right-click on the campaign name you want to add the new project to, then select Add Project from the popup. A new blank project form will open in the Project Summary tab on the right side of your screen.
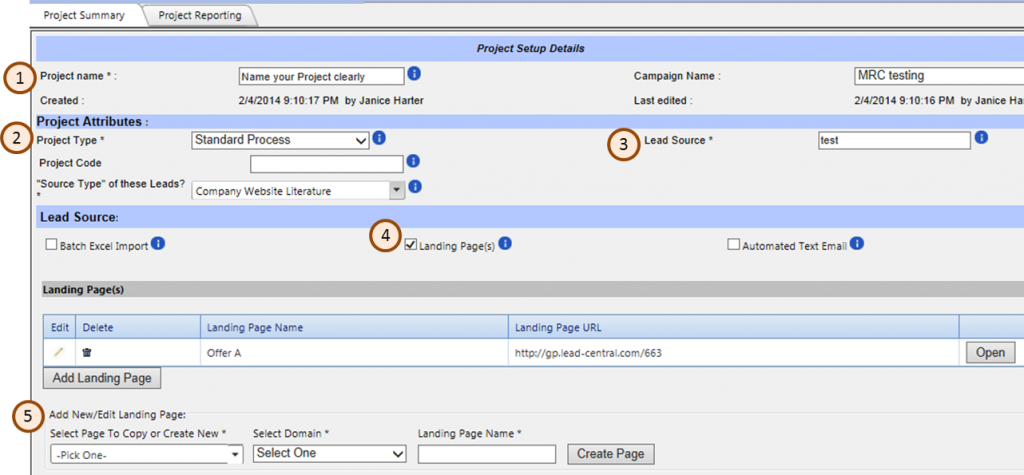
Setup_Project_with_LandingPage

The first thing you want to do is fill out the (1) Project Name. Use naming standards that your company has set up so it is easy to find project. A typical naming standard is [vendor]/[media tactic]/ [start date], for example EPE/Webinar/March 2014.

Next to the Project Name is the Campaign Name, which is automatically filled in for you. If necessary, you can move the project to a different campaign by opening the project, then selecting a new Campaign Name using the dropdown in the Project Setup Details section.

Enter Project attributes

Under Project Attributes you have three options for (2) Project Type: Standard Process, Custom Process and Send Batch Email. For this example, we chose the Standard Process.

      • Standard Process: This process is used when you want to create a project that won’t need any special rules for handling the responses. The standard rules can be utilized to grade, assign the leads and send out specific communications after a lead is generated.
      • Custom Process: This process is used when special handling of the leads is necessary. The leads will follow the rules for Grading and Assigning however the communications that are sent out following the lead entering the process are customized. The grading and assignment rules can also be modified using the process.
      • Send Batch Email: This process sends emails to a target list, no leads are entered into the project.

Additional options that need to be included on the Project Attributes include:

    • Project Code is used for specialized lead handling, leave this field blank. If specialized rules are needed, call GrowthPoint to discuss if you need special lead handling and we can help determine how to accomplish your goals.
    • In the Division drop down choose the appropriate division for which the leads are intended. This selection is used for reporting purposes and is unique per client, it is possible that you will not see this field.
    • In the Source Type of these Leads? dropdown choose an option. This is the marketing tactic for the lead, there is a drop down to select from, you can also add to the list if there is a source type missing. However it is important to keep the list concise.
    • Enter the (5) Lead Source – the lead source is seen by the sales person and is utilized to track the lead. The source can be the same as the project name but does not have to be. The Lead Source might be common between several projects if you want to group them together. A case where this may be used is a set of events.

Select Lead Source

The Lead Source section indicates how the lead are being generated. Leads can be entered from an excel spreadsheet, via a LeadCentral Landing Page(s) or from a text email or from more than one Source. Description of Lead Sources:

    • Batch Excel Import: When the leads are being entered from an excel file for tactics like a tradeshow this box is checked.
    • Landing Page(s): When leads are entered via a LeadCentral Landing page this option is selected. More information about setting up a landing page can be found here.
    • Automated text email: This option is used to collect leads by integrating with other systems or websites, if you need more detail or want to explore this option contact GrowthPoint.

In this example we are entering leads via a (4) Landing Page, check the box next to that item. When this is selected the screen changes and an Add Landing Page button appears.

Click the Add Landing Page Button, in the (5) Add New/Edit Landing Page section that appears after you do this, Select a Page to copy from the Select Page To Copy or Create New dropdown.  Scroll down to Master Templates and Misc., click the plus by project entitled Current Branded Landing page Templates. Choose the desired landing page to copy. There is an overview of the available pages and their purposes in the Tools menu of your systems, under Template Examples.

You can choose to add a blank page and utilize a Wireframe to create the page. Wireframes are template that give you the look and feel of the page desired and with the editable sections being text and photos so that you know the functionality of your page will work, the layout will work good, and all you have to worry about is getting your message right. To get more details on how to use a landing page wireframe click here.

Choosing from this list will allow you to copy a page that is in brand compliance, has the appropriate fields contained and has been tested to ensure it looks good in a wide variety of browsers. After you have chosen a page to copy, select a domain from the drop down and name your landing page. Select a name for your page that is clear and concise, note that the viewer can see the page name you entered in the tab on their browser. When you are done entering this information click Create Page.

If you want to test several landing pages on your project you will need to set up an A/B test which will allow 2 or more pages to be tested against each other. For more detail on how to set up an A/B test click here.

Select how leads will be assignedLead_Distribution

In the Lead Distribution section select from the drop down to indicate who should receive the leads. All leads are assigned even if they are not sent to sales. Choose default unless you know another option is appropriate.


Select lead grading methodLead_Qualification

In the Lead Qualification section choose a grade as a default for the project. Filter rules can override the grade selected here. A grade coming in part of the lead from the file or a landing page will override the default grade set at the project level.


The Telesales Required field is check if leads are going to be assigned to telesales, to use this option talk to GrowthPoint.

Customer CommunicationsCustomer_Communications
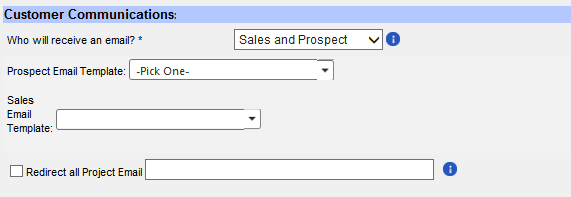
In the Customer Communications section you have the option to choose who will receive emails when the lead is entered into the system. The email to the sales notifies the sales person that they have a lead to follow up on gives them details Once the lead is in the system it is important to send a communication to the prospect to thank them for their interest, further engage the prospect with additional offers and provide them with the name of their sales person.

    • Sales and Prospect: Both the prospect and Sales person will receive an email message when the lead is entered. It is always good to email the Prospect to engage them further. The Sales persons needs to be notified when they are assigned a new lead for follow-up. Only leads that are graded Hot or warm will be sent to the sales person even if this option is selected.
    • Sales Only: An email is sent to the sales person when the lead is entered in the system, emails to sales are only sent if the lead is Hot or Warm. If this option is selected and the lead grade is not Hot or Warm no email will be sent. This option is used when you don’t want to send the prospect an email, maybe they have previously received one, or the leads are old and you want Sales to follow-up but not notify the prospect because of the delay.
    • Prospect Only: An email is sent to the prospect but not to the sales person. This is an good option for an event registration
    • None: No emails are sent out.

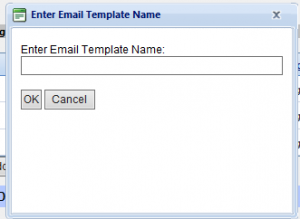
Enter Email Template NameAfter you have selected who will receive an email additional boxes will appear to select the email templates you want to use based on who should receive an email. For the Prospect email option select the Blank Template in the Prospect Email Template from the dropdown. This will give you a blank slate for entering content. After you have selected a template you will have the option to name your email template. When you are done click OK. Later you will have an option to select a wireframe and enter the data for your email. If you wanted to copy a previously created email select the desired template from the Campaign/Project listing found in the drop down.

For the Sales Email template dropdown choose the default sales template.

The Redirect all Project Email box in the Customer Communication section is used when testing a project. If you check the option and enter an email address all the projects emails will be sent to this address. This will be discussed further in the testing section.

Project Goals

The Project Goals section is optional if the data is entered, it can used when completing reporting on the project. Notes and comments can be entered in the box at the bottom of the form, these notes can only be seen when inside the MRC.

When you are done making changes click update. After you have clicked update you will see your new project listed on the left side of the screen with the email templates you indicated.